“HR Payroll module for CRM SYSTEM” Documentation by “Applify Technologies”
“HR Payroll module for CRM SYSTEM”
Created: 2023-05-23
By: Applify Technologies
Email: crm@applify.com.my
Table of Contents
How to use HR Payroll module - top
I. Settings (HR Payroll -> Settings)
Human resource Payroll settings menu: In this menu, declare user settings, used for functions in the module(eg: Employees management, Attendance management, Deductions, Insurance, Payroll template,...)
-
Income tax Rates (HR Payroll / Settings / Income tax Rates)
It is attributes
1.1 Manage Income tax Rates screen
Create new Income tax Rates: HR Payroll -> Setting ->Income tax Rates -> Add
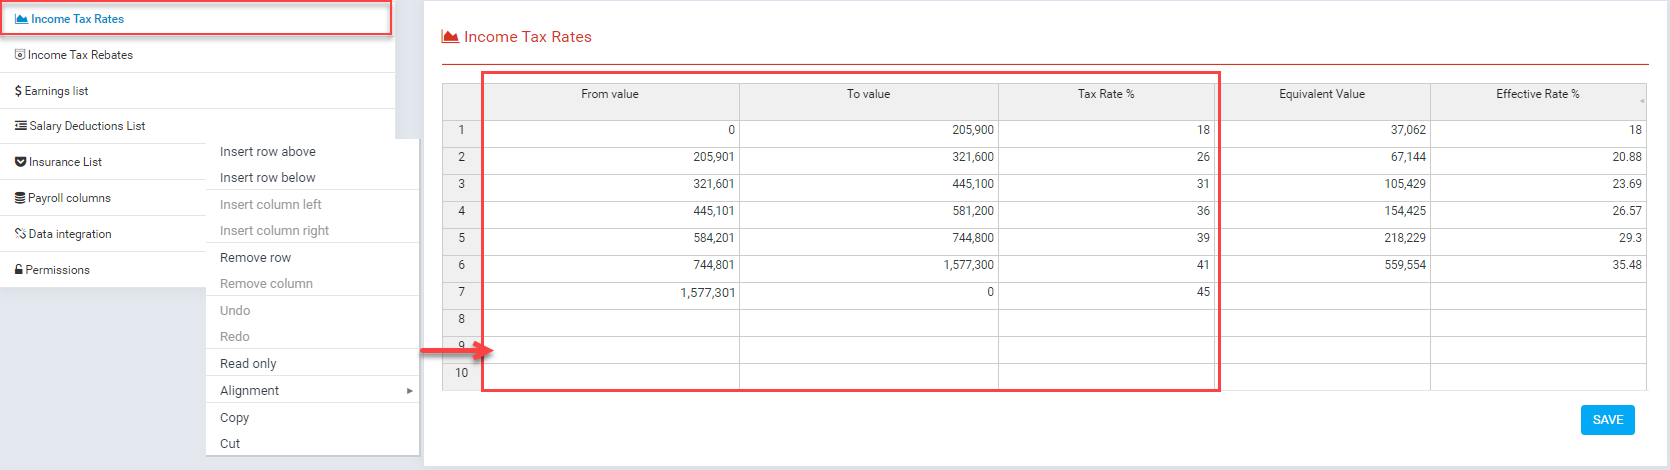
- Required columns: "From value", "To value", "Tax Rate %".
Declare the levels when calculating personal income tax, income tax is calculated according to the progressive formula. In this screen display all Income tax Rates, allow "create", "edit", "delete".
- If you want add value: enter value into table and click "Save" button, edit value: update value of cell need update and click "Save" button, delete row: click right mouse into row need delete and seletet "Remove row". Support add, update, delete multiple row.
Example: If input 300,000 => Income tax = (205,900*18/100)+(300,000-205,901)*26/100 = 61,527.74
Because 300,000 would be taxed at two levels
Level 1: 0 to 205,900 => 205,900*18/100
Level 2: 205,901 to 300,000 => (300,000-205,901)*26/100
For value >= 1,577,301 will be taxed 45%.
-
Income tax rebates (HR Payroll / Settings / Income tax rebates)
Create new Income tax rebates: HR Payroll -> Setting ->Income tax rebates -> Add
2.1 Manage Income tax rebates screen
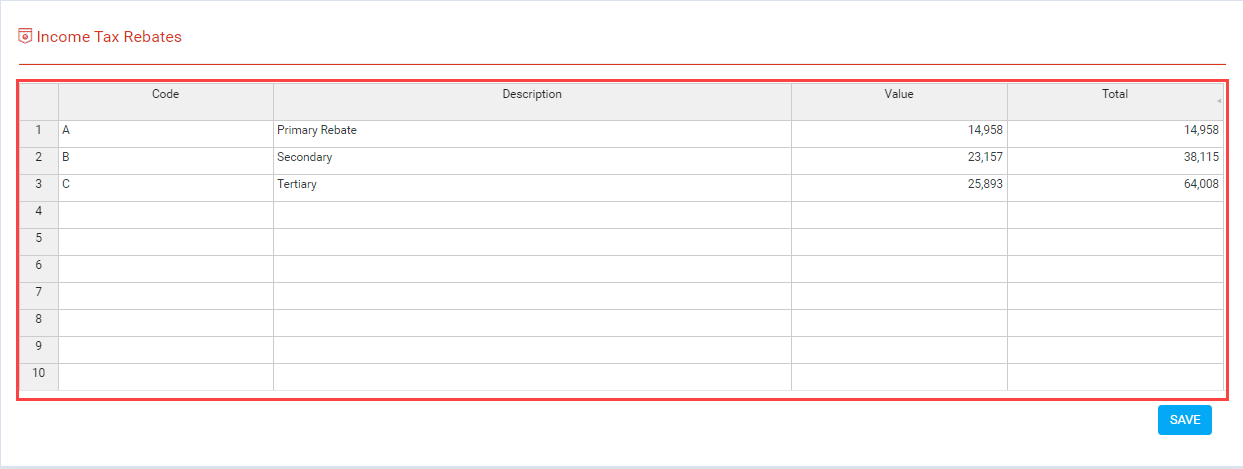
- Required columns: "Code", "Description", "Value".
Declare income tax rebates codes, Each employee, if assigned with a code (Code column), will get the corresponding value from the column "Total". In this screen display all Income tax rebates, allow "create", "edit", "delete".
-
Earnings list (HR Payroll / Setting / Earnings list)
Create new Earnings list: HR Payroll -> Settings ->Earnings list -> Add
3.1 Manage Earnings list screen
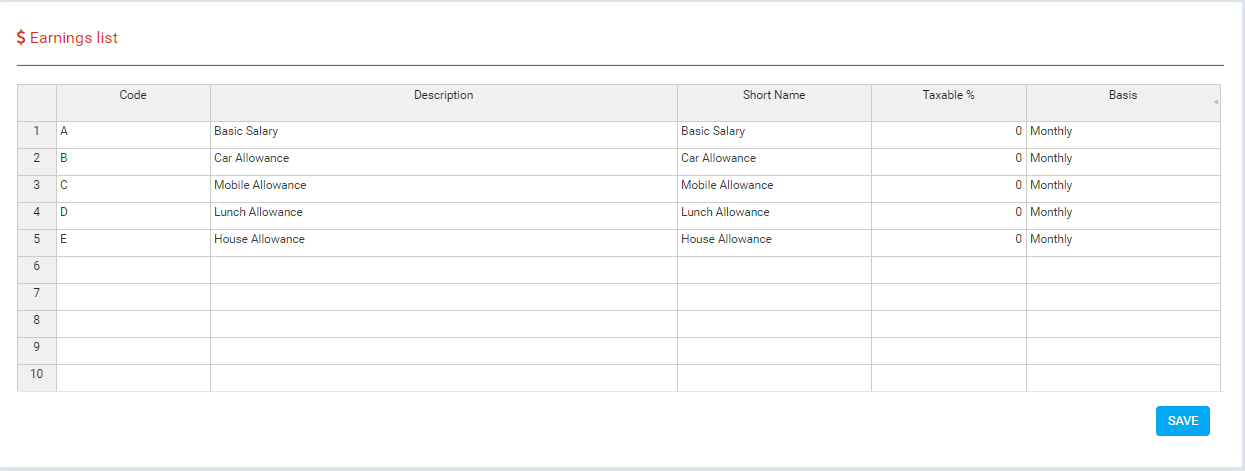
- Required columns: "Code", "Description", "Short Name", "Taxable %", "Basis".
Each type of earning applicable to your business needs to be added to this list. Enter an earnings code, description, short name, the taxable % and specify whether the earning type is applied on a monthly or annual basis. Monthly earning values for each employee needs to be entered on the Employees table. In this screen display all Earnings list, allow "create", "edit", "delete".
-
Salary Deductions List (HR Payroll / Settings / Salary Deductions List)
Create new Salary Deductions List: HR Payroll -> Settings ->Salary Deductions List -> Add 4.1 Manage Salary Deductions List screen
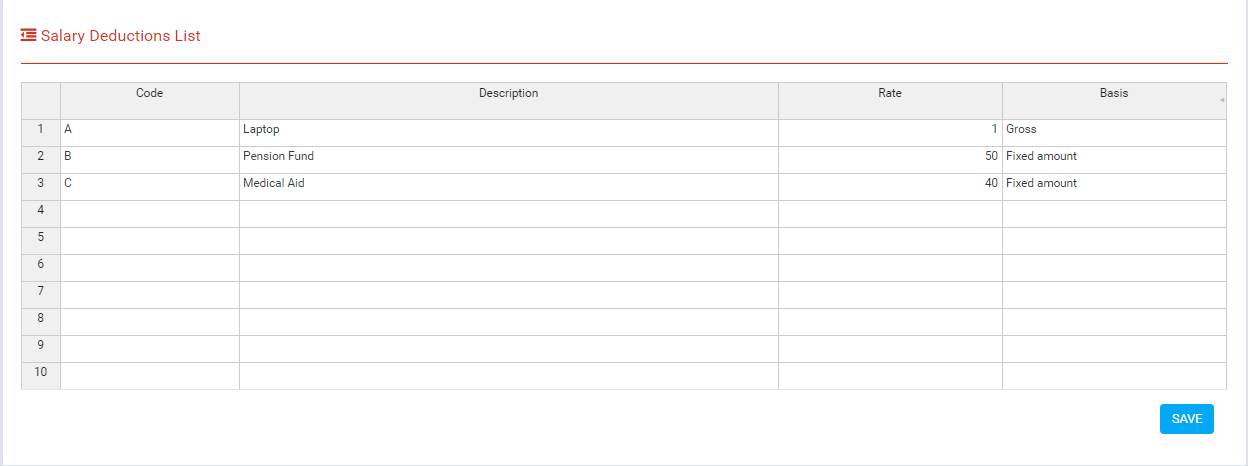
- Required columns: "Code", "Description", "Rate", "Basis".
Each salary deduction that applies to your business needs to be added to this list. if "Basis Type" is "Gross" then this deduction is calculated as a percentage of "Gross pay" in "Payroll" with percentage get from "Rate column". Contrast if "Basis type" is "Fixed amount" then deduction value will be get from "Rate column".
In this screen display all Salary Deductions List, allow "create", "edit", "delete".
-
Insurance List
Insurance List (HR Payroll / Settings / Insurance List)
Create new Insurance List: HR Payroll -> Settings ->Insurance List 5.1 Manage Insurance List screen
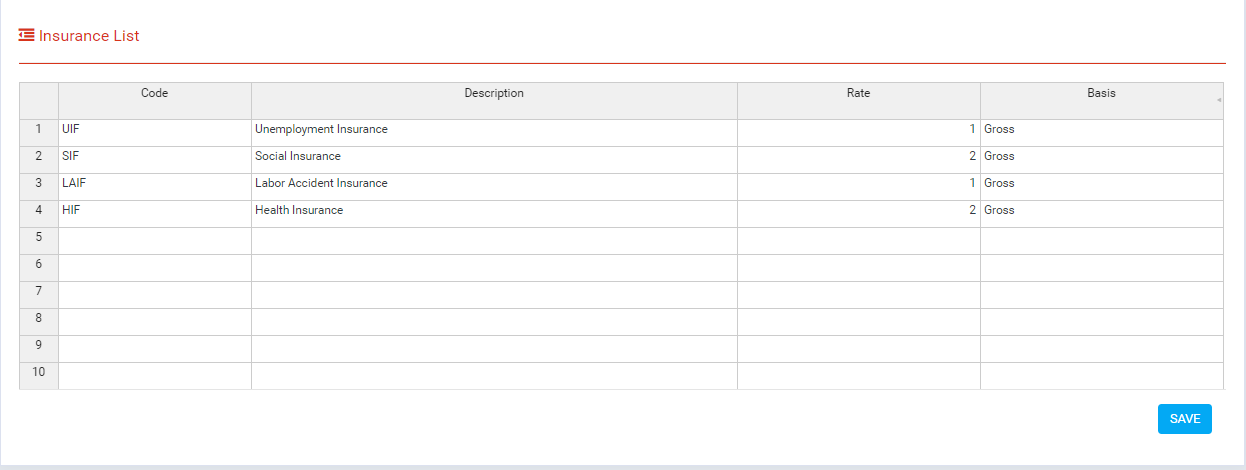
- Required columns: "Code", "Description", "Rate", "Basis".
Each Insurance that applies to your business needs to be added to this list. if "Basis Type" is "Gross" then this deduction is calculated as a percentage of "Gross pay" in "Payroll" with percentage get from "Rate column". Contrast if "Basis type" is "Fixed amount" then deduction value will be get from "Rate column".
In this screen display all Insurance List, allow "create", "edit", "delete".
-
Payroll columns
Payroll columns (HR Payroll / Settings / Payroll columns)
Create new Payroll columns: HR Payroll -> Settings ->Payroll columns 6.1 Manage Payroll columns screen
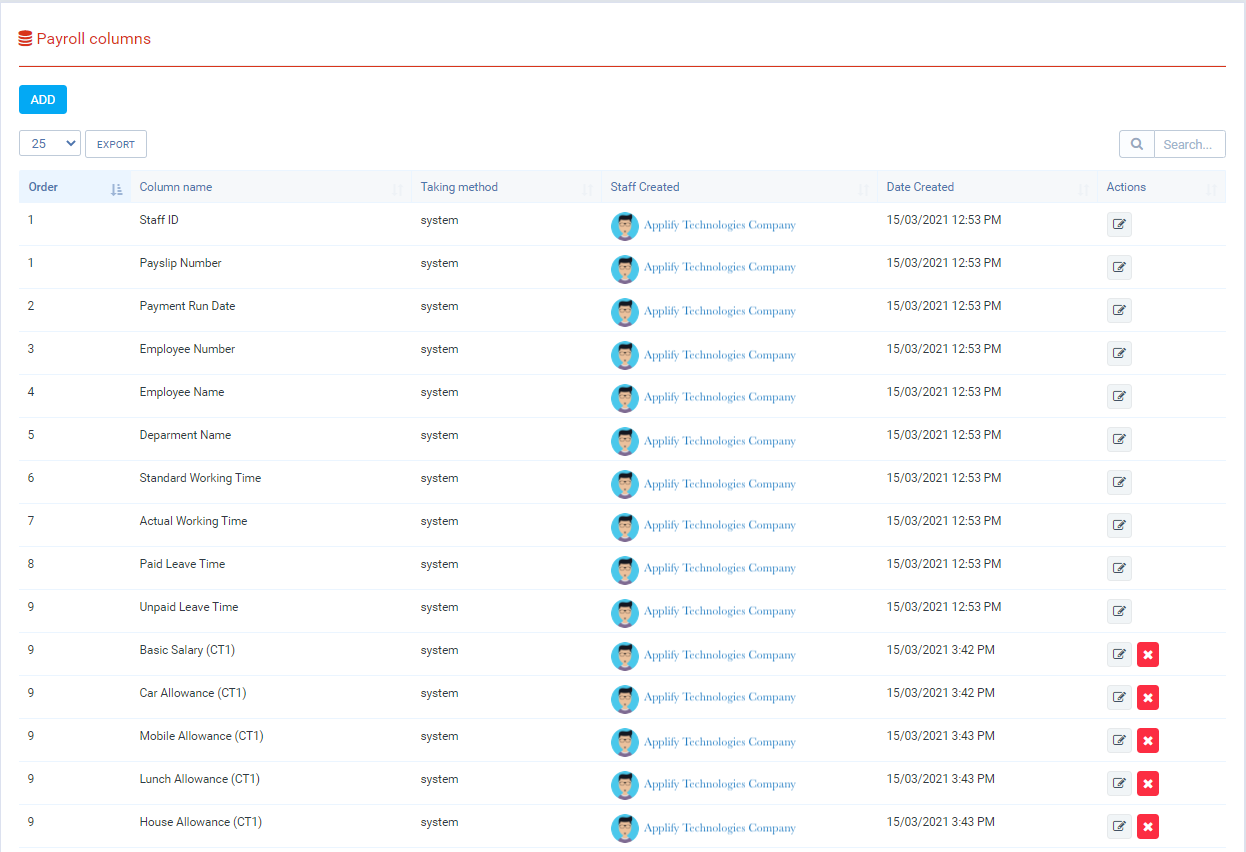
- Declare the columns to be used when creating payroll templates. When activate the module, we have created 21 columns, these columns are the columns that when creating the mandatory payroll form, in addition you can also add other columns to get data as well as support calculations.
Add new payroll column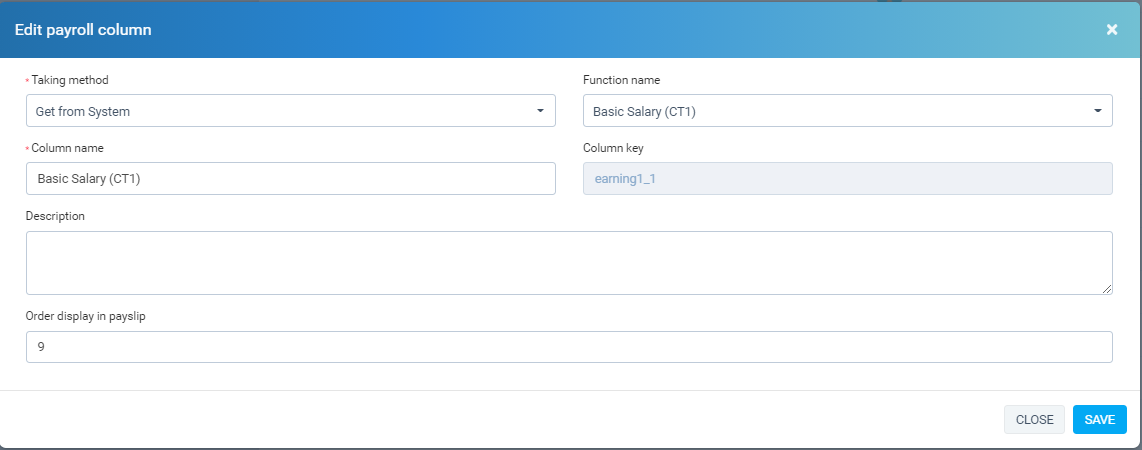
- Required columns: "Taking method", "Function name", "Column name", "Column key", "Order display in payslip".
- Taking method:
+ "Get from System" is get data from the system, for example: get "Earnings list", "Salary deduction", "Insurance".
+ "Taken from the formula" this column is the column you will enter the formula when creating the payroll template
+ "Constant" you enter number when creating the payroll template
- Function name: If you want to get Earning type from the system, you need to create a column with the "Column name" and "Funtion name" which is the name you declared in the "Earning list".
- Column key: only enter when "Taking method" is "Taken from the formula" or "Constant": It is the key to distinguish the columns, so need to enter different key between the columns - Description: description for the column
- Order display in payslip: The columns will be displayed in order from small to large on the payroll
In this screen display all Payroll columns, allow "create", "edit", "delete".
-
Permissions
Permissions (HR Payroll / Settings / Permissions)
It is attributes of item
7.1 Manage Permissions screen
Create new Permissions: HR Payroll -> Setting ->Permissions -> Add

In this screen display all Permissions assign for staff in Hr Payroll module, allow "create", "edit", "delete".
7.2 Create New Permissions screen
In manage screen click button "ADD".
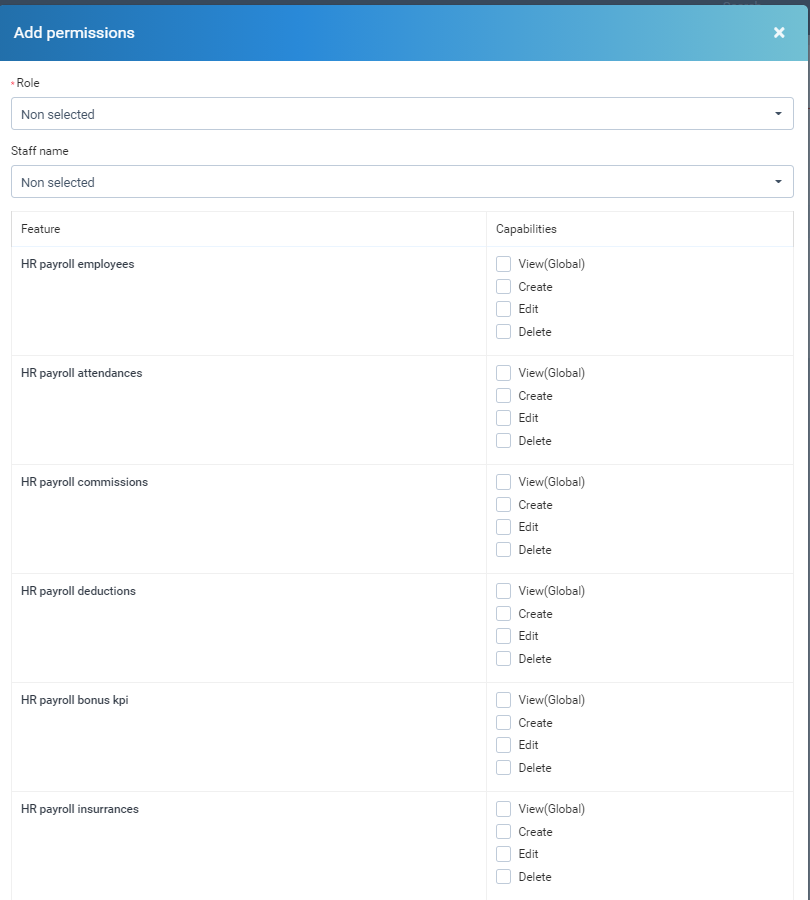
In this screen create Permissions.
Permissions with attribute.
7.3 Edit Permissions screen
If you select only "role" then all employees with that role will have their respective permissions updated below. otherwise, If you choose a role and an "Staff name", only permissions of employee will be updated
- "Role" - "Staff name".
- "Feature": funtion in main menu .
- "Capabilities": permission : view, create, edit, delete .
In manage screen click button "Edit".
7.4 Delete Permissions
In manage screen click button "Delete".
-
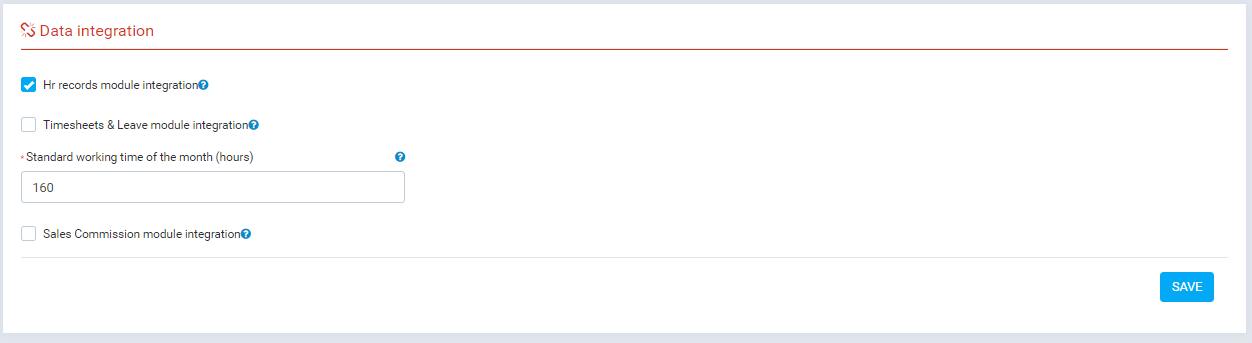
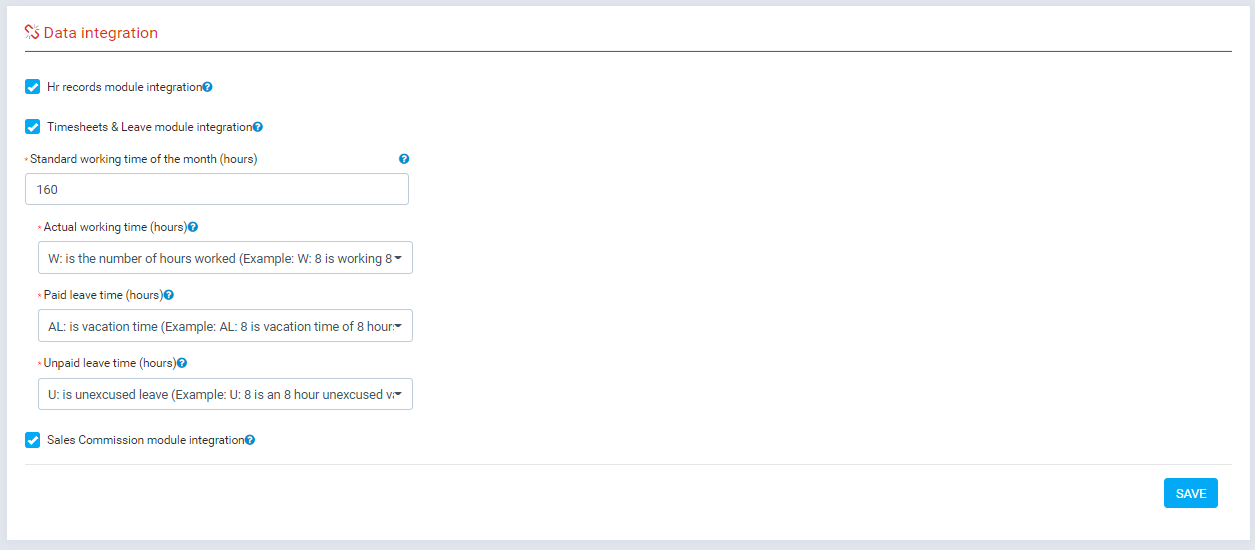
Data integrations (HR Payroll / Settings / Data integrations)
8.1 Manage Data integrations screen
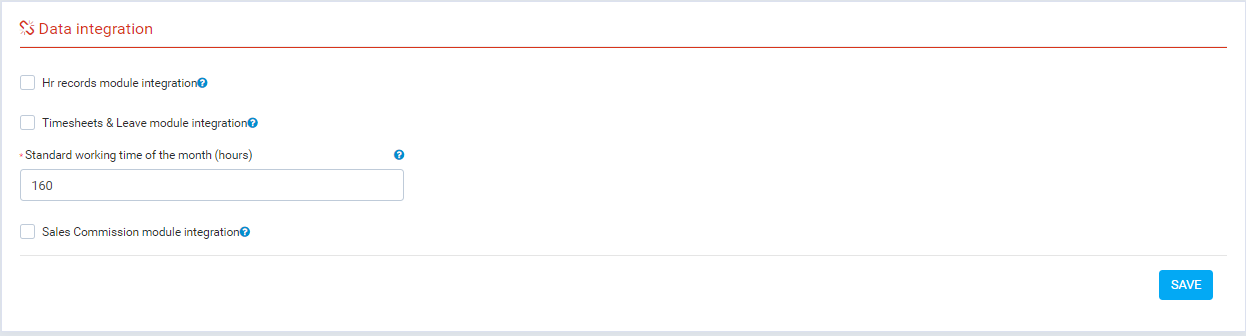
- If you use the "HR records" module, you can integrate contract information, as well as some employee information: "job position", "tax code", "employee code".
- If you use the "Timesheet & Leave" module, you can integrate Attendance information, as well as some employee information: "shifts".
- If you use the "Sales Commission" module, you can integrate Commission Amount information.
- Standard working time of the month (hours): Without integration with the "Timesheet & Leave" module, this will be the standard time of the month, you can change each employee in the "Attendance" menu.
- Management screen
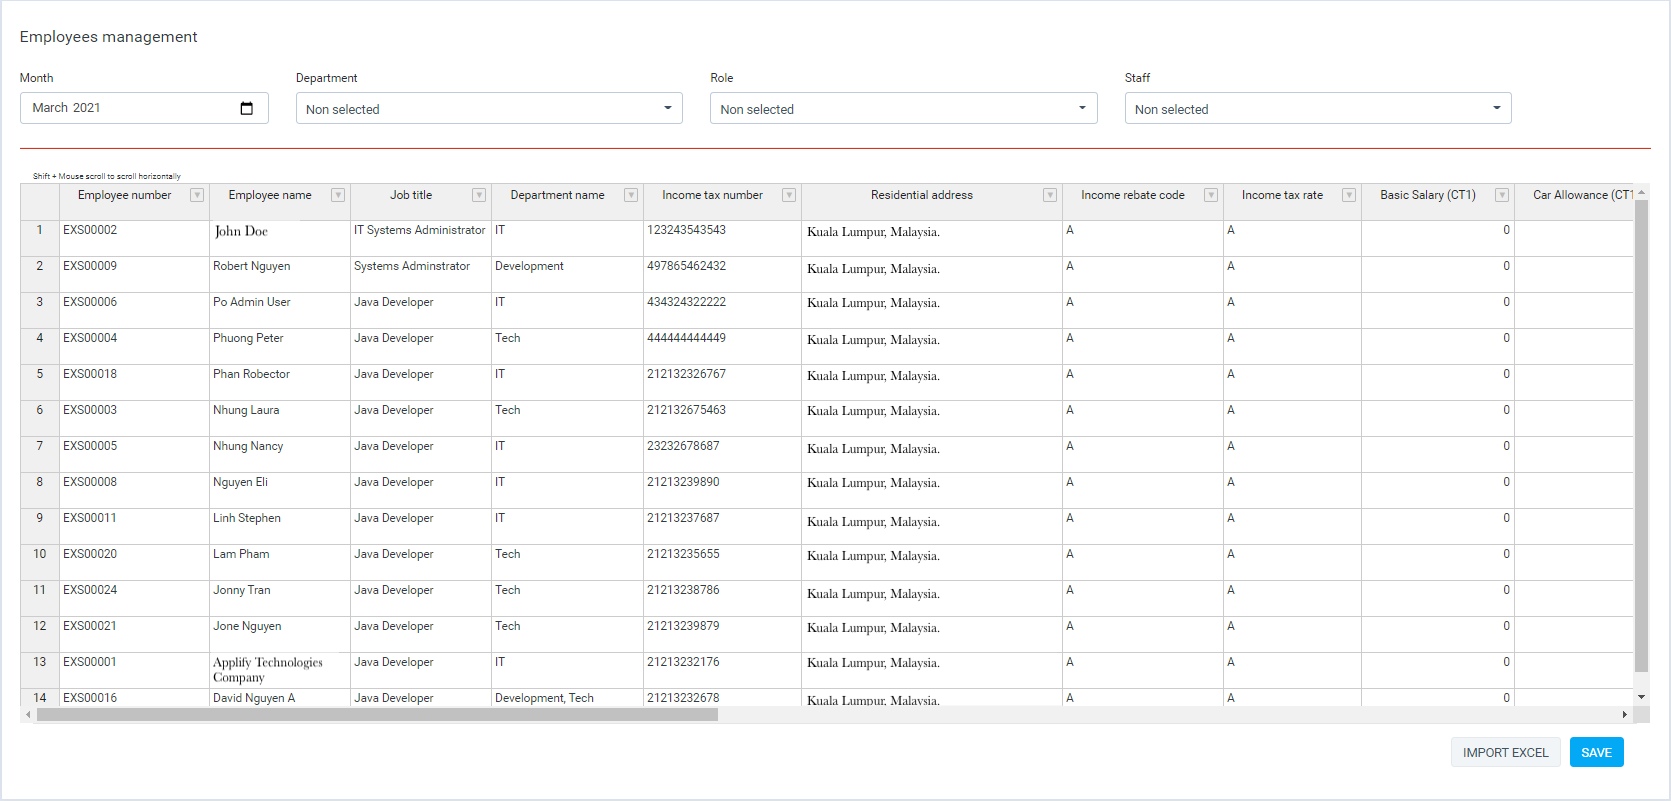
- Income rebate code: If the employee is assigned a tax rebate code, the corresponding value will be received
- Income tax rate: If the employee is assigned a Income tax rates code, the corresponding value will be received
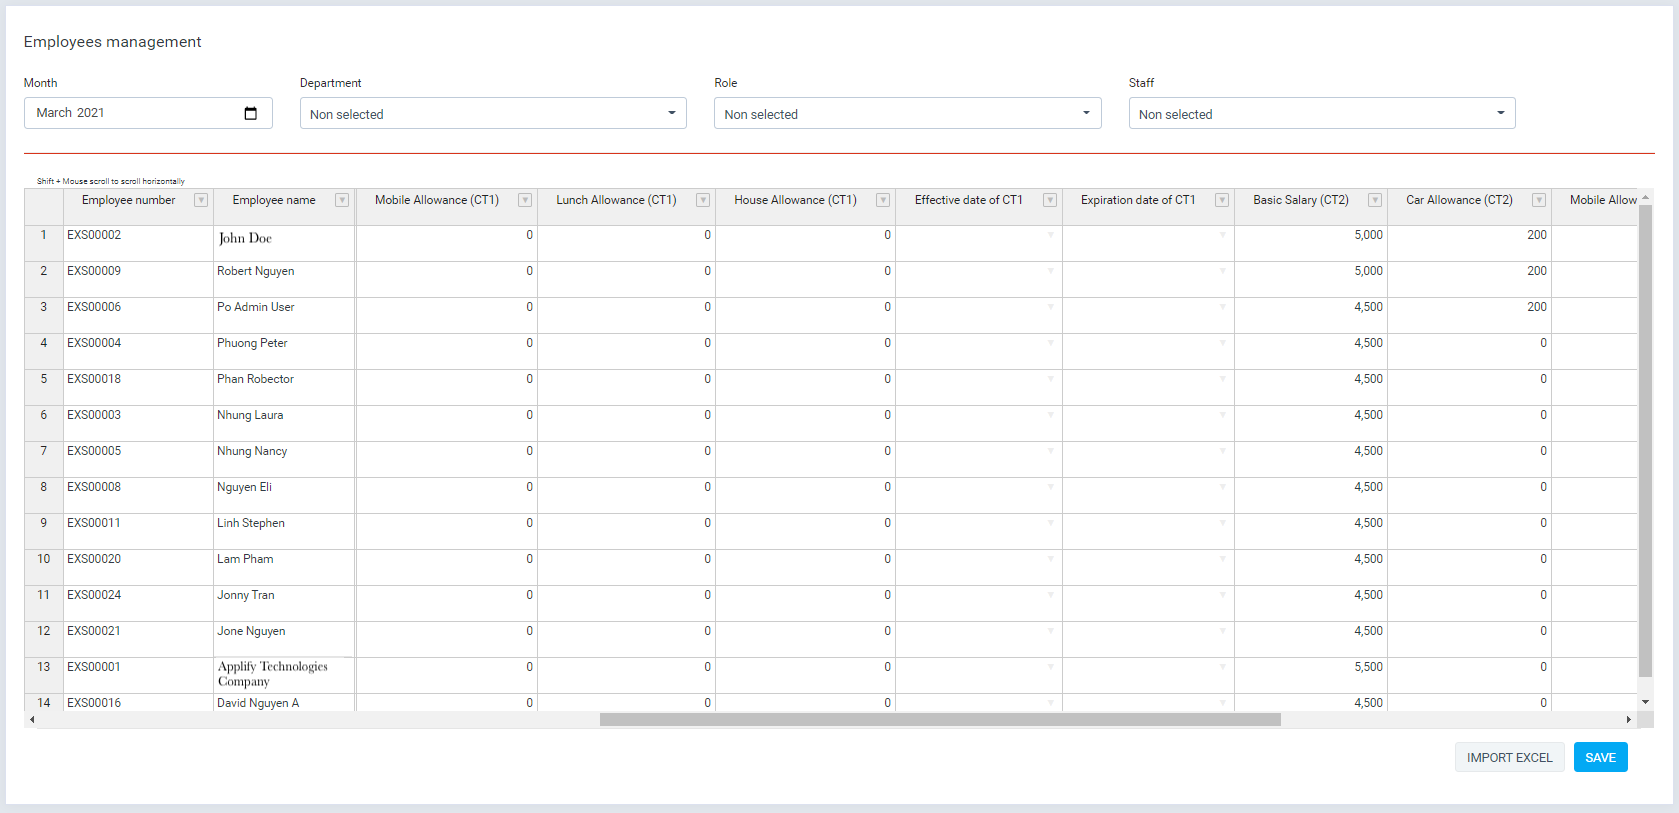
- Employee information management, employee earnings list for the month. If an employee has two valid contracts in a month (eg probationary contract from 1 to 10, formal contract 11 to 30), the columns marked "CT1" will be used for the probationary contract, while "CT2" will be used for the formal contract. If the employee only has 1 contract per month, please fill in the value in the box labeled "CT2".
-Enter earnings for each employee
-Enter earnings for each employee via excel import file.
- Add earnings for each employee manual
- Fill data into table, after click "Save" button
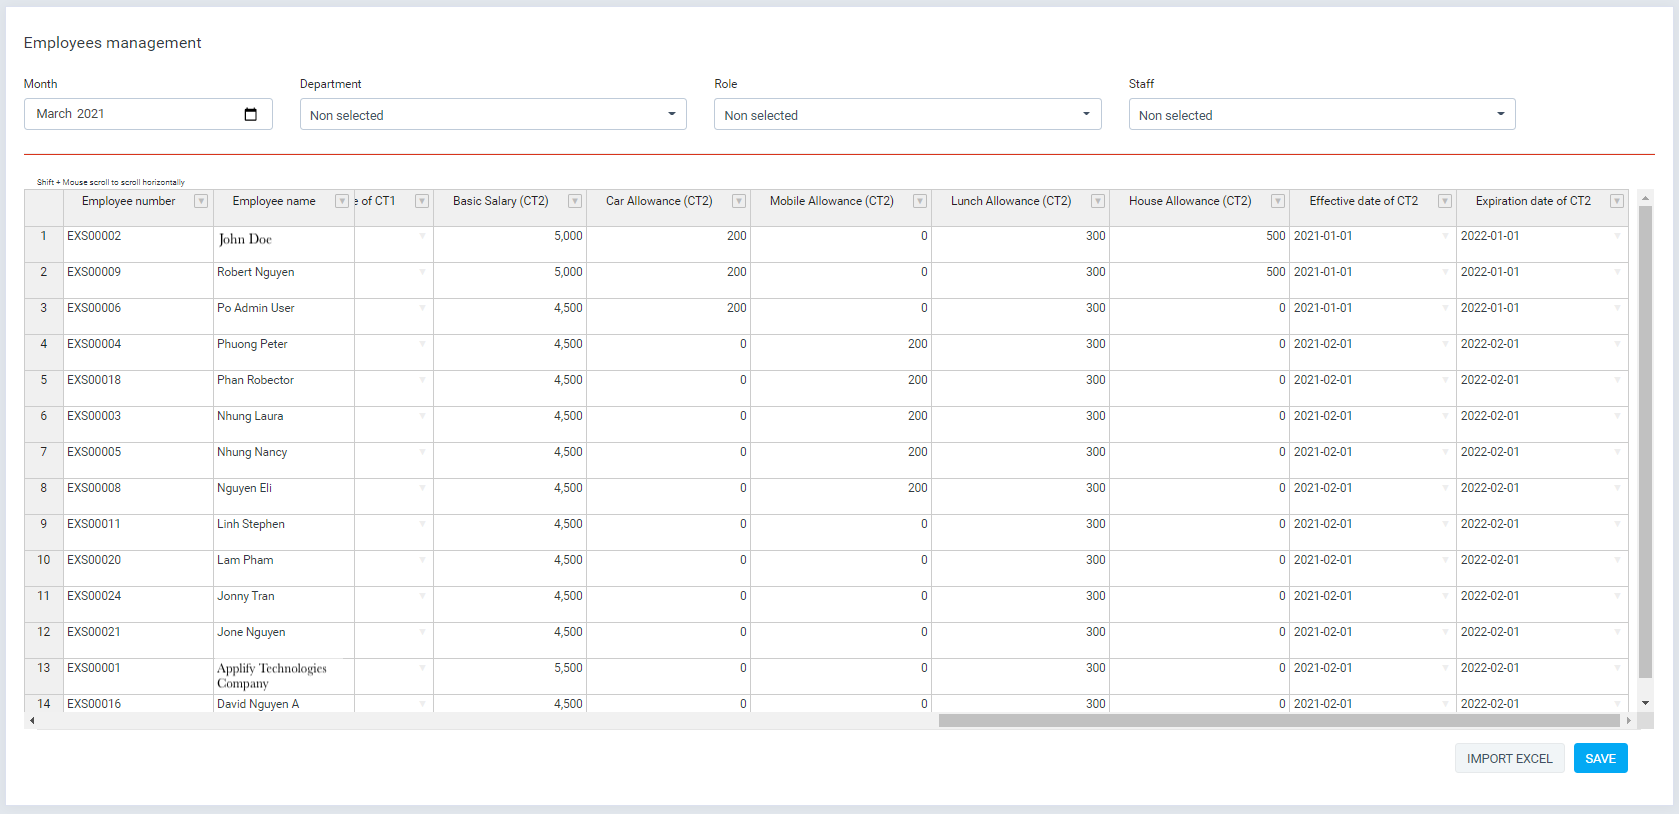
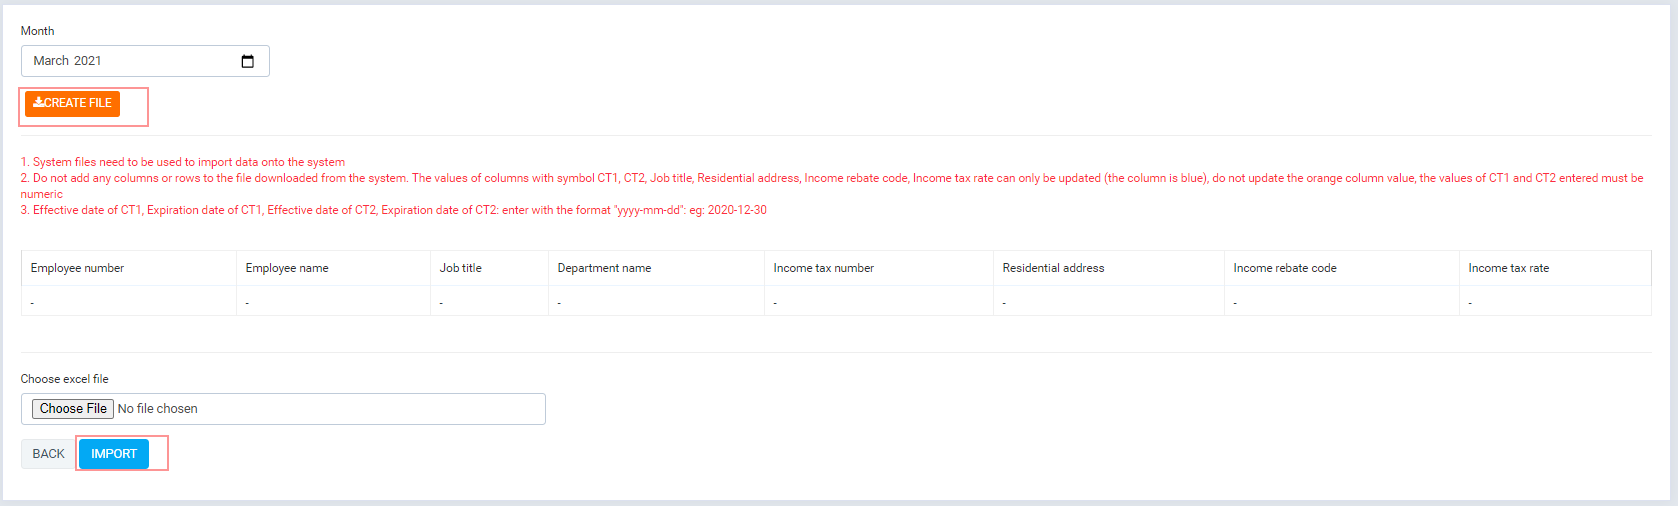
- Enter earnings for each employee via excel import file
- Click "Import excel" button
- Download the file corresponding to the month in which you want to import the data
- Only be updated (the column is blue),
- Import file after enter data
- Enter earnings for each employee via HR Records module if integration Hr records module
- Go to "Settings/Data Integration", enable option "Hr records module integration" and click "save" button
- Go back Employees manage screen and click "Data Synchrnization" button, and "staff contract", 'Job title', "Income tax number" from "Hr records" module will be updated into here
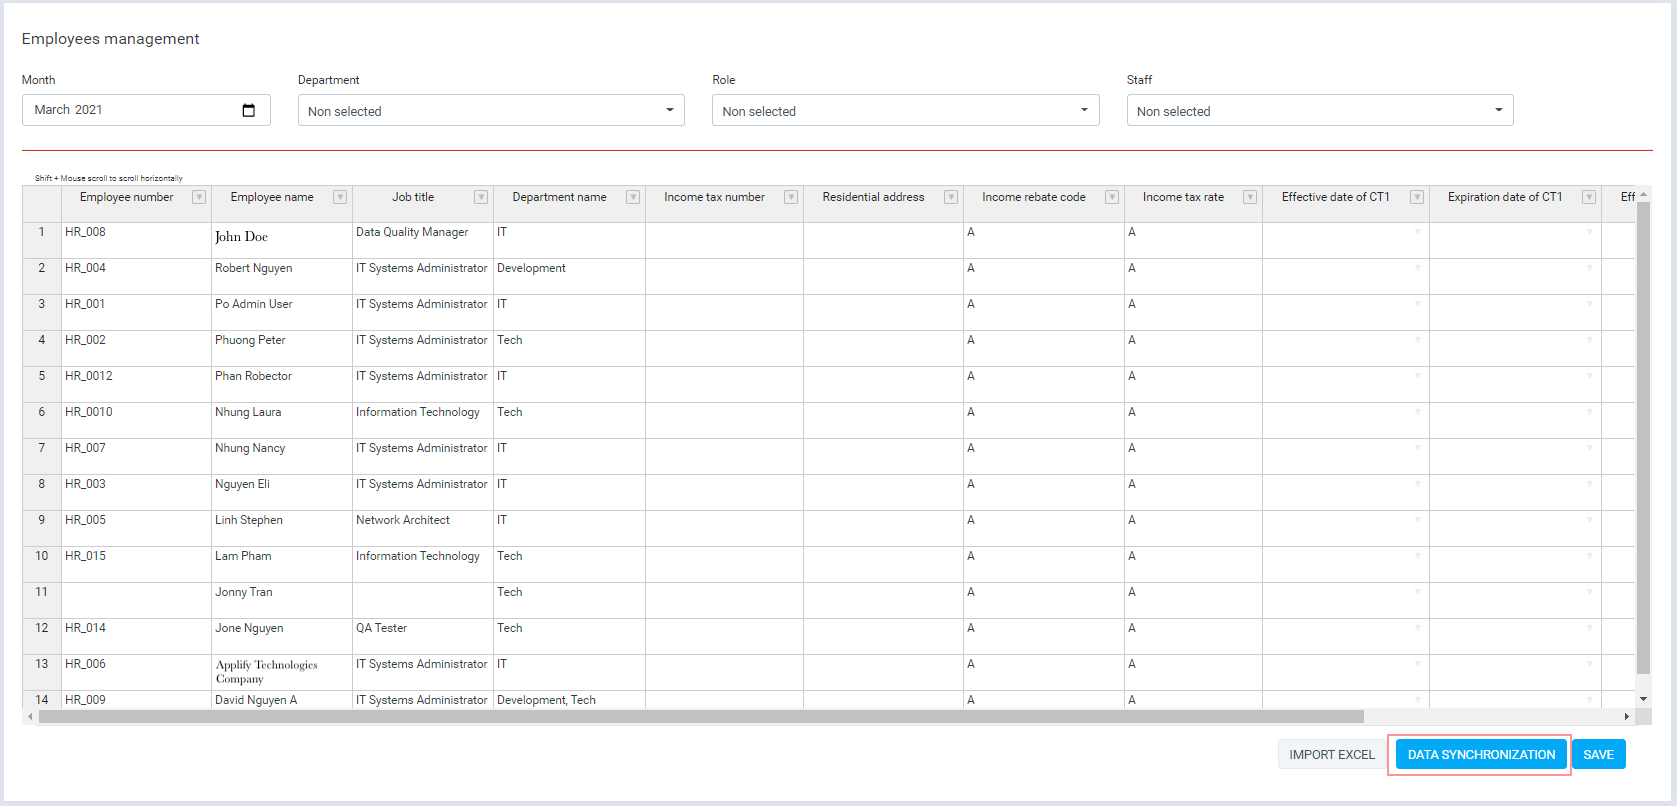
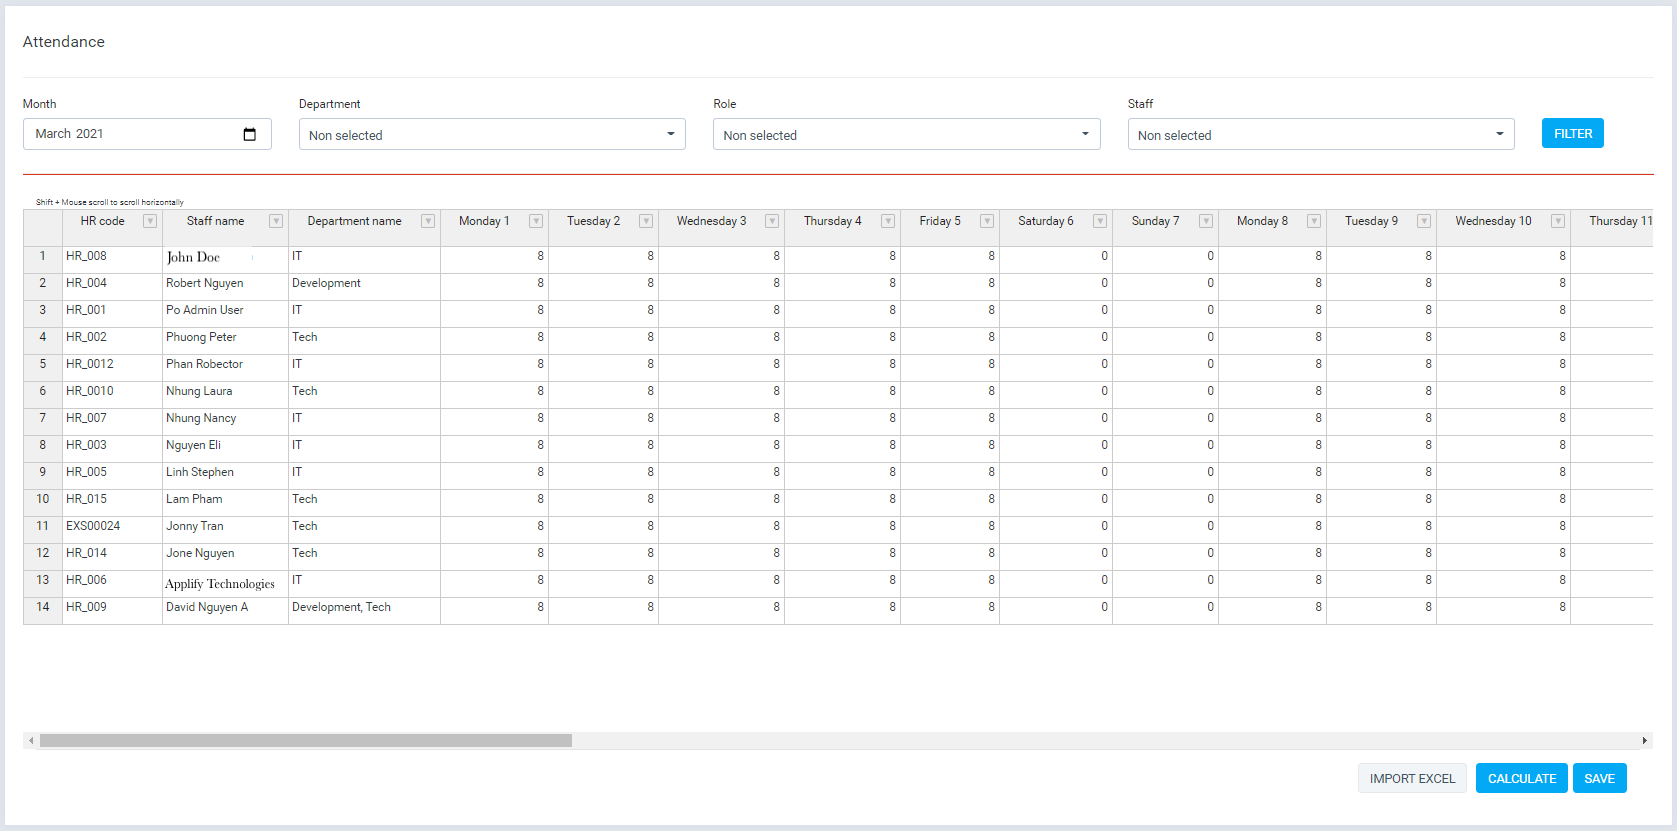
- Management screen
- Manage employees working hours in the month, summing up working hours in the month (Column Actual working time), Define Standard working time of the month, Paid leave time, Unpaid leave time.
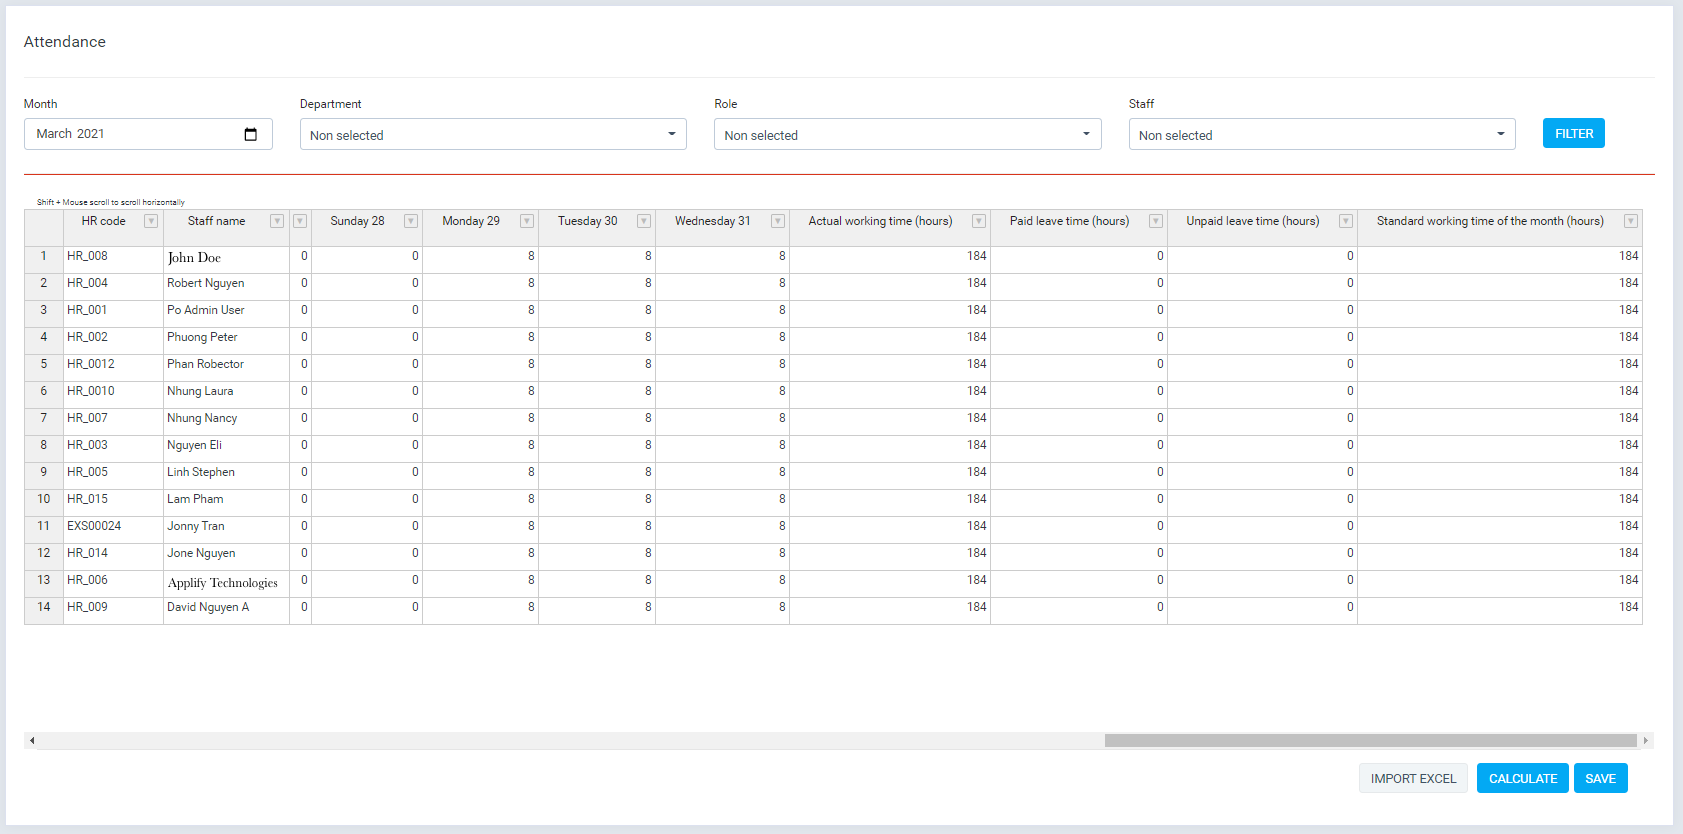
- Add Attendance for each employee manual
- Enter the data manually by entering the value in the table and clicking the save button
- Enter Attendance for each employee via excel import file
- Click "Import excel" button
- Download the file corresponding to the month in which you want to import the data
- Only be updated (the column is blue),
- Import file after enter data

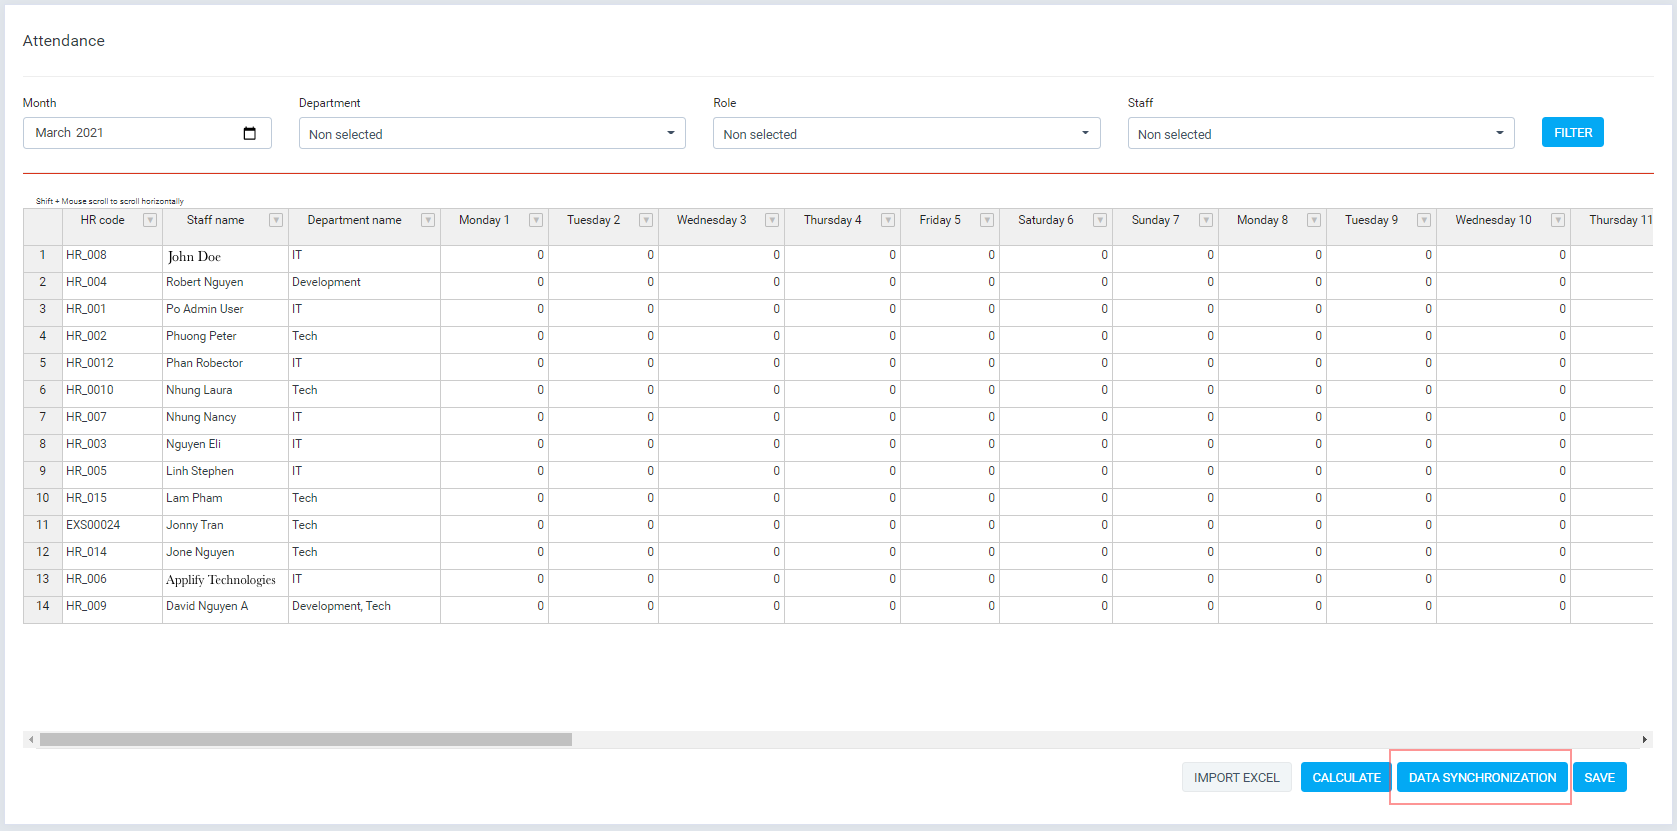
- Enter Attendance for each employee via Timesheet & Leave module if integration Timesheet & Leave module
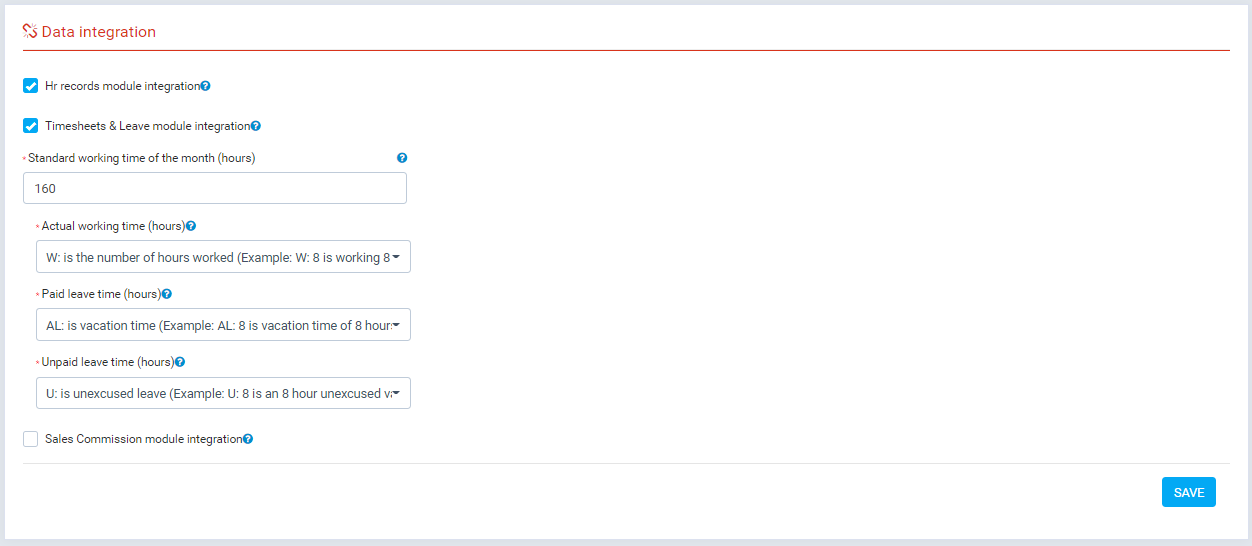
- Go to "Settings/Data Integration", enable option "Timesheets & Leave module integration", You can choose what type of timekeeping will be aggregated into "actual working time", "Paid leave time", "Unpaid leave time", and click "save" button
- Go back Attendance manage screen and click "Data Synchrnization" button, and Attendance data from "Timesheet & Leave" module will be updated into here
- Management screen
- Manage employees commission in the month.
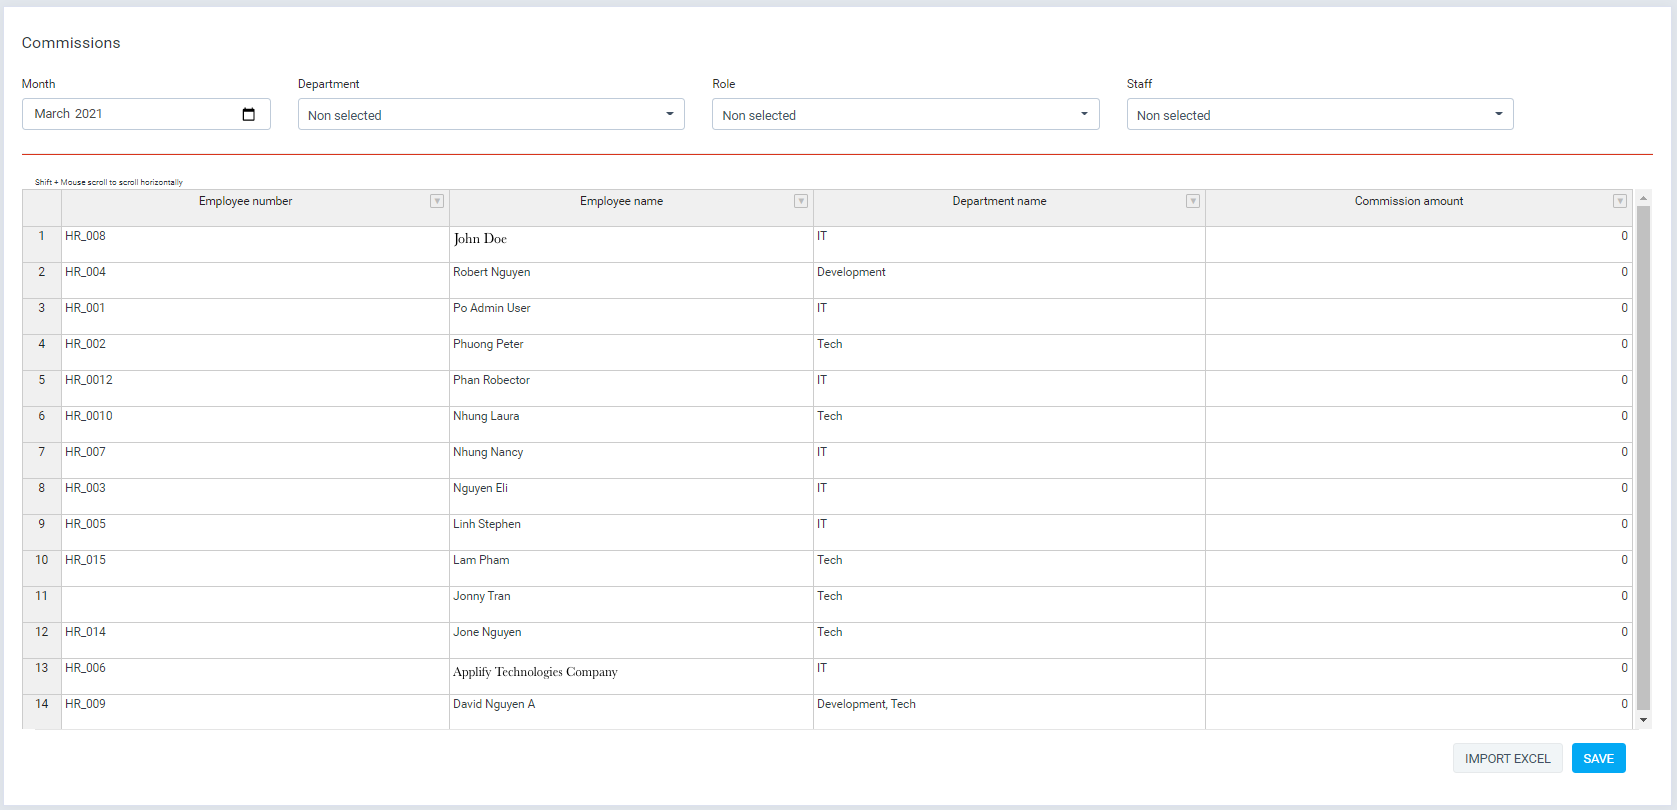
- Add Commission for each employee manual
- Enter the data manually by entering the value in the table and clicking the save button
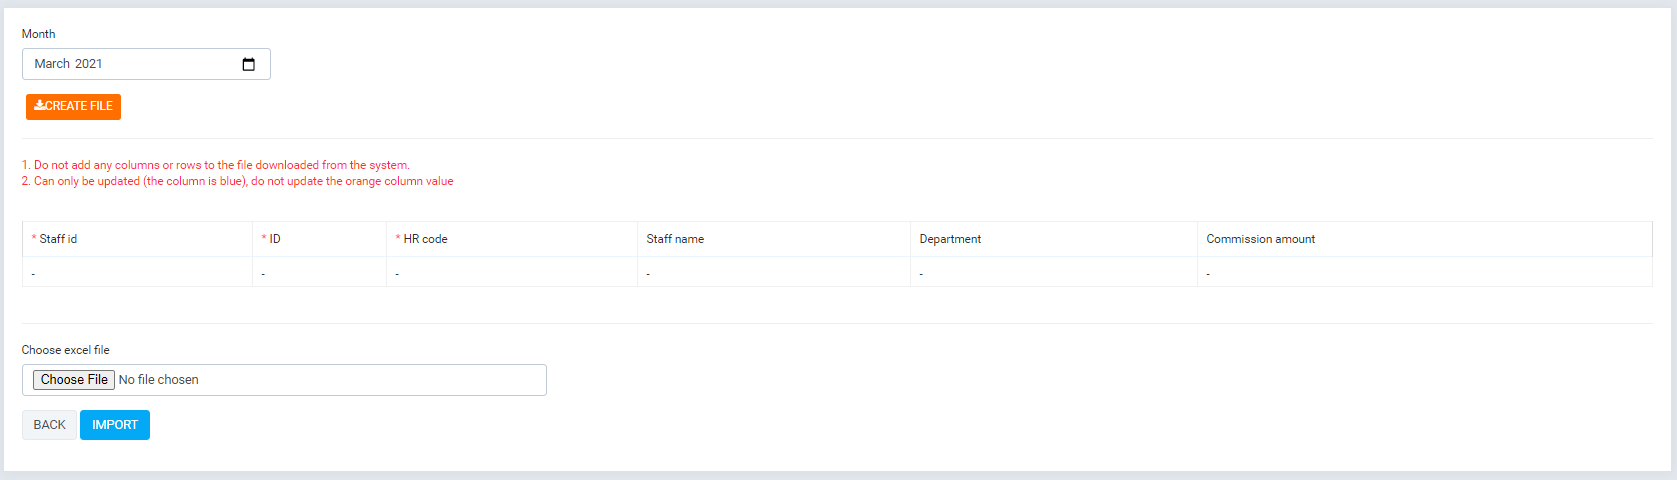
- Enter Commission for each employee via excel import file
- Click "Import excel" button
- Download the file corresponding to the month in which you want to import the data
- Only be updated (the column is blue),
- Import file after enter data
- Enter Commission for each employee via Sales Commission module if integration Sales Commission module
- Go to "Settings/Data Integration", enable option "Sales Commission module integration",and click "save" button
- Go back Commissions manage screen and click "Data Synchrnization" button, and Commission amount from "Sales Commission" module will be updated into here
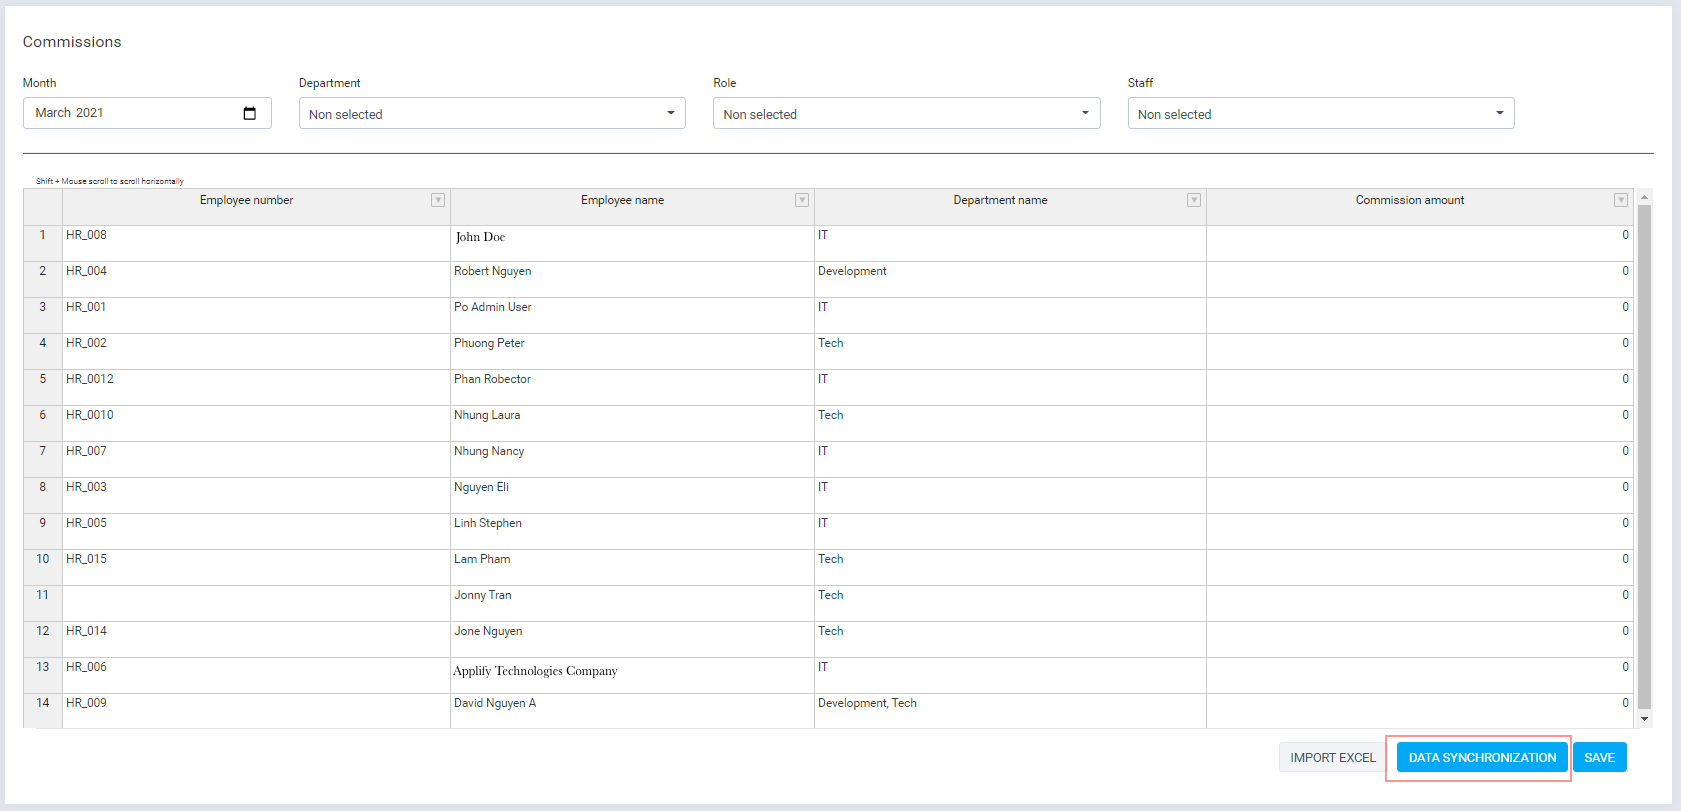
- Management screen
- Manage employees deductions in the month.

- Add deductions for each employee manual
- Enter the data manually by entering the value in the table and clicking the save button
- Management screen
- Manage employees bonus kpi in the month.
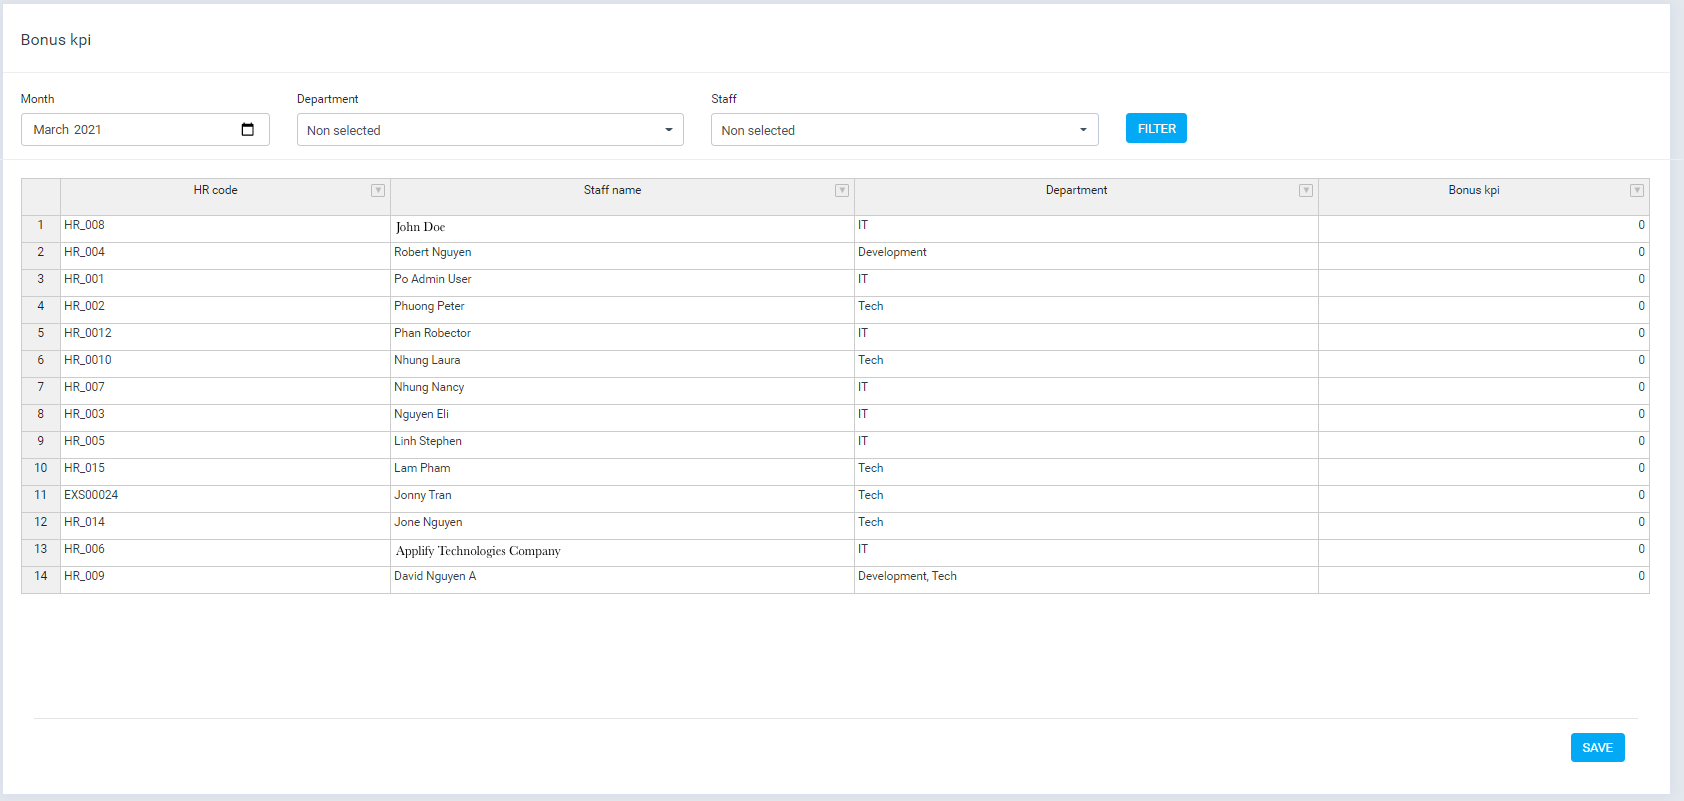
- Add bonus kpi for each employee manual
- Enter the data manually by entering the value in the table and clicking the save button
- Management screen
- Manage Insurances in the month.
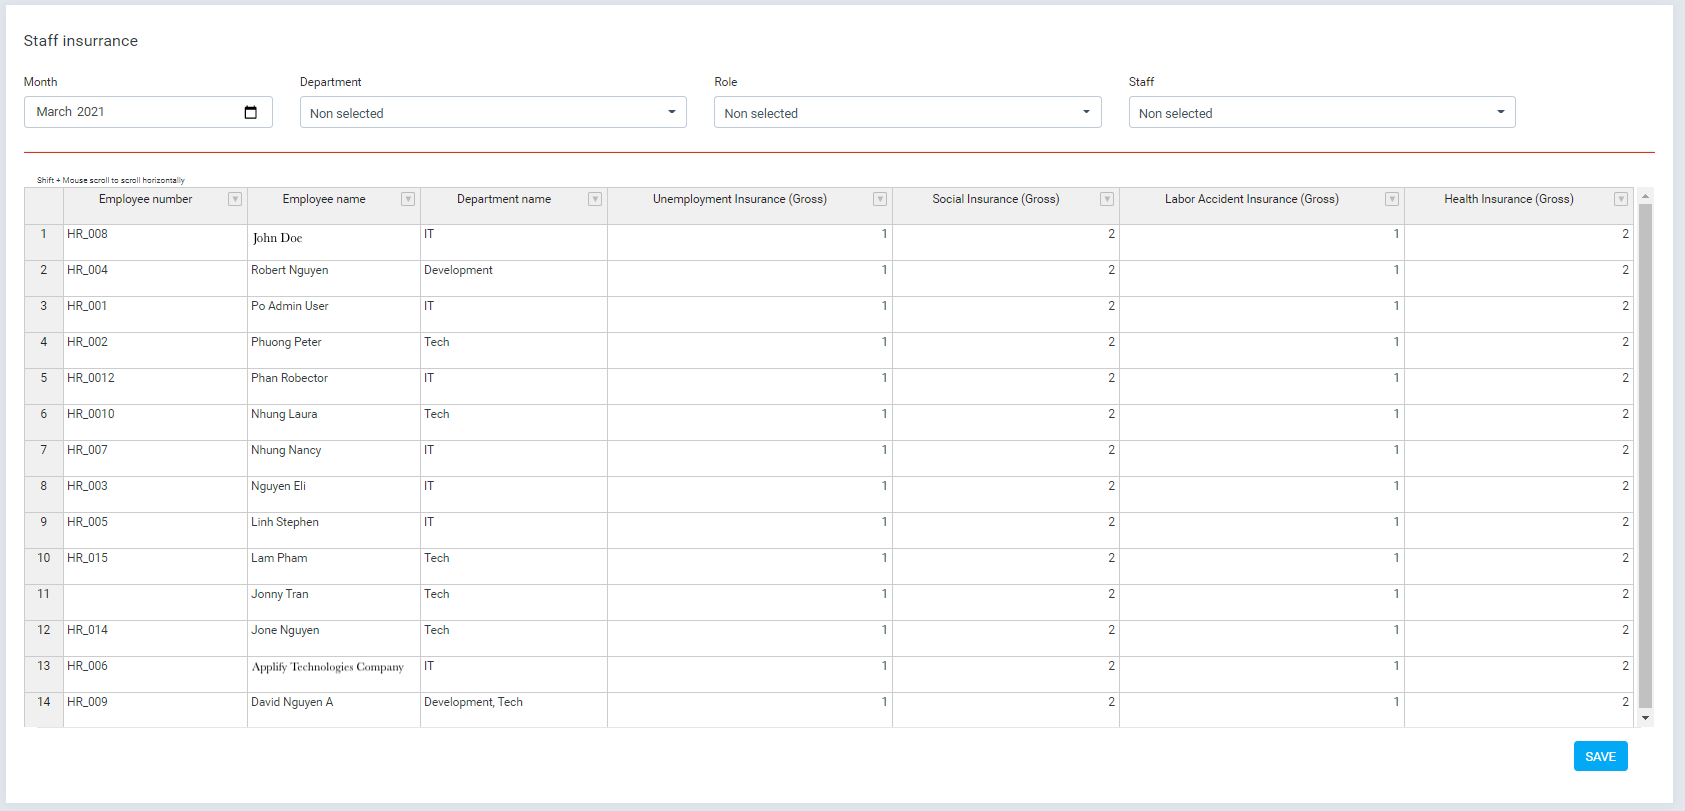
- Add insurances for each employee manual
- Enter the data manually by entering the value in the table and clicking the save button
- Management screen
- Manage payslip template.
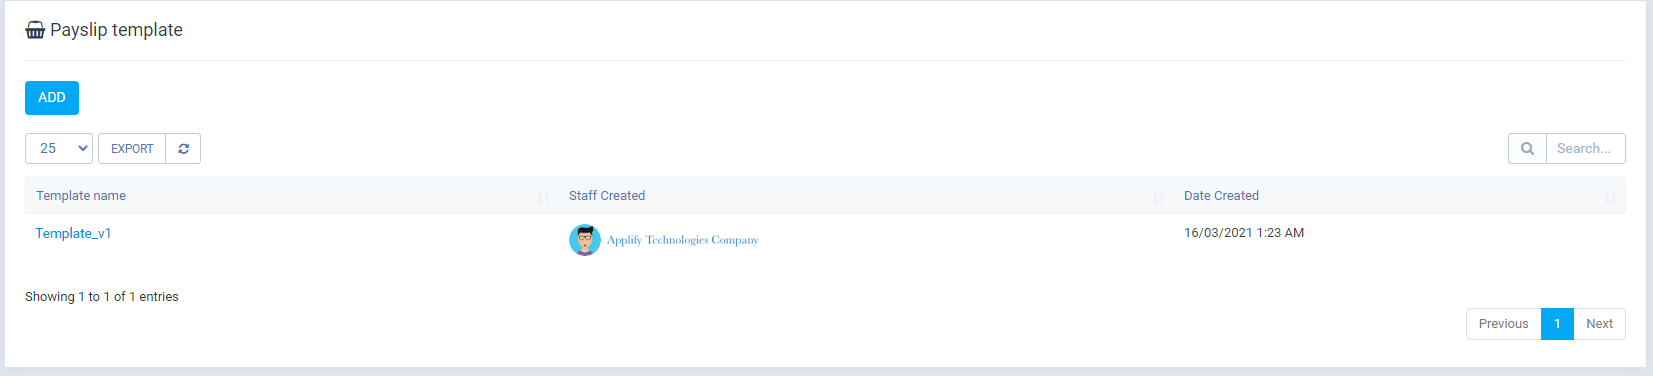
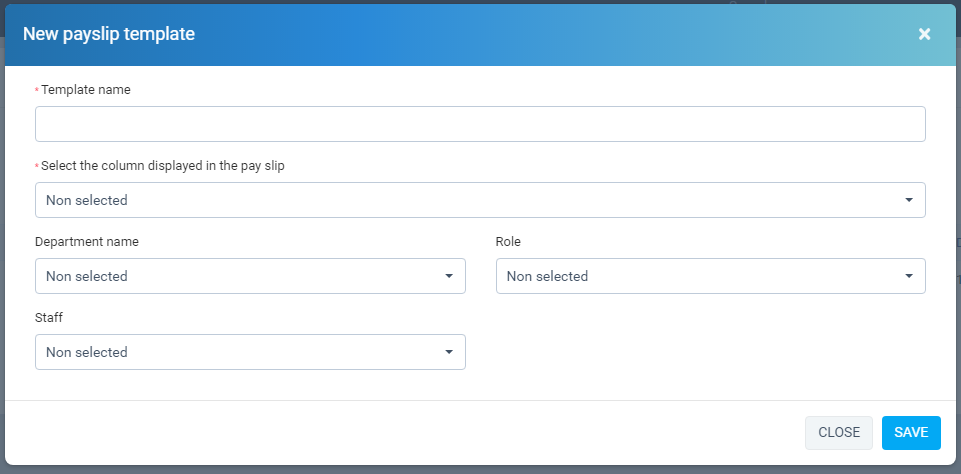
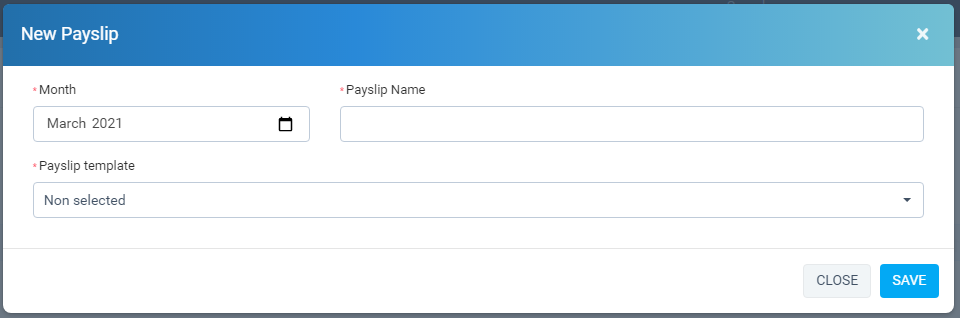
- Create new Payslip template
- Required: "Template name", "Payslip column", "Department" or "Role" or "Staff"
- Payslip template created

- Here is a sample payslip created, without adding or deleting any columns and rows, only updating the formula for row 6 for columns that are formulas, or constants.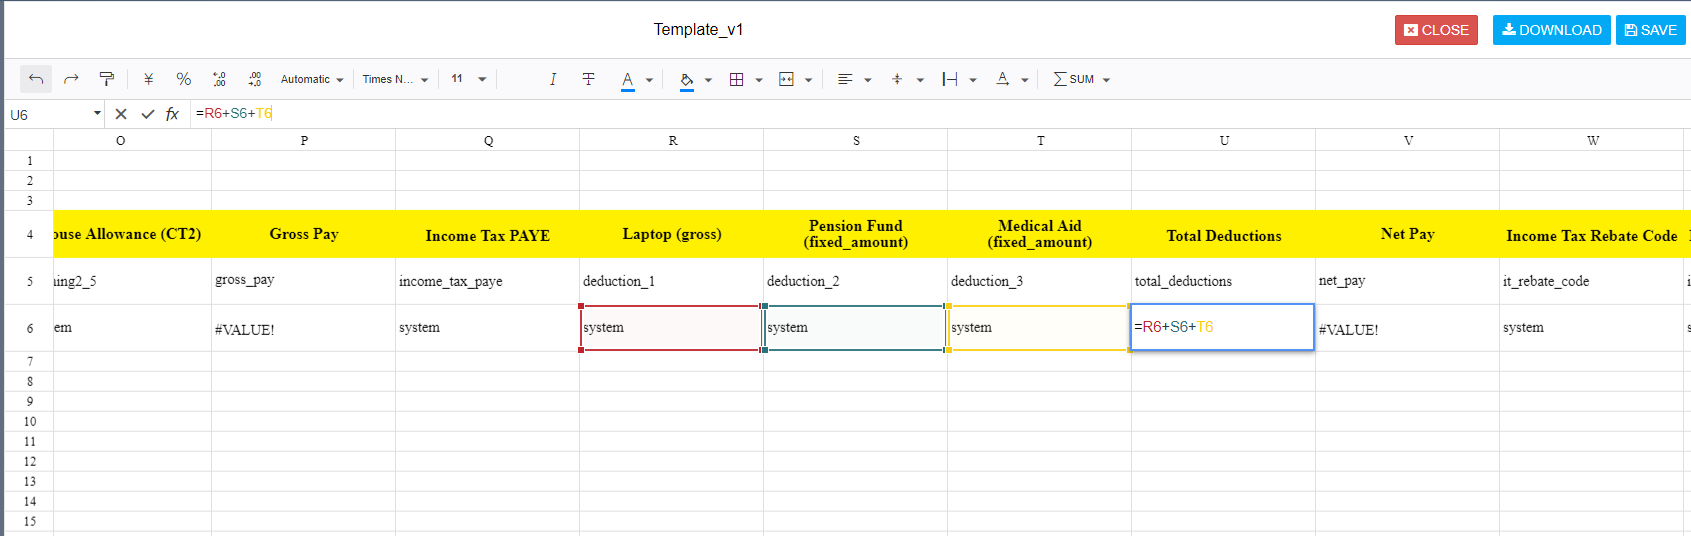
- Payslips management screen
- Status: have 2 status
+ Payslip closing: if the payslip has this status, the employee will see the payslip on their profile
+ Payslip opening: if the payslip has this status, the employee will not see the payslip on their profile
- Options: If payslip have status "Payslip closing" you can change to "Payslip opening"
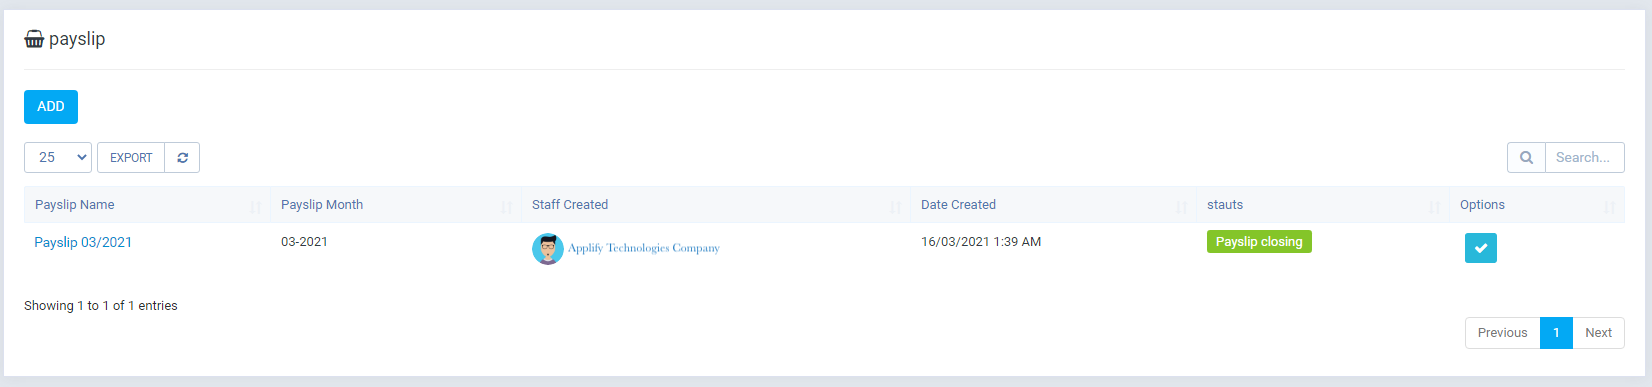
- Add payslip (Click "Add" button)
- View payslip
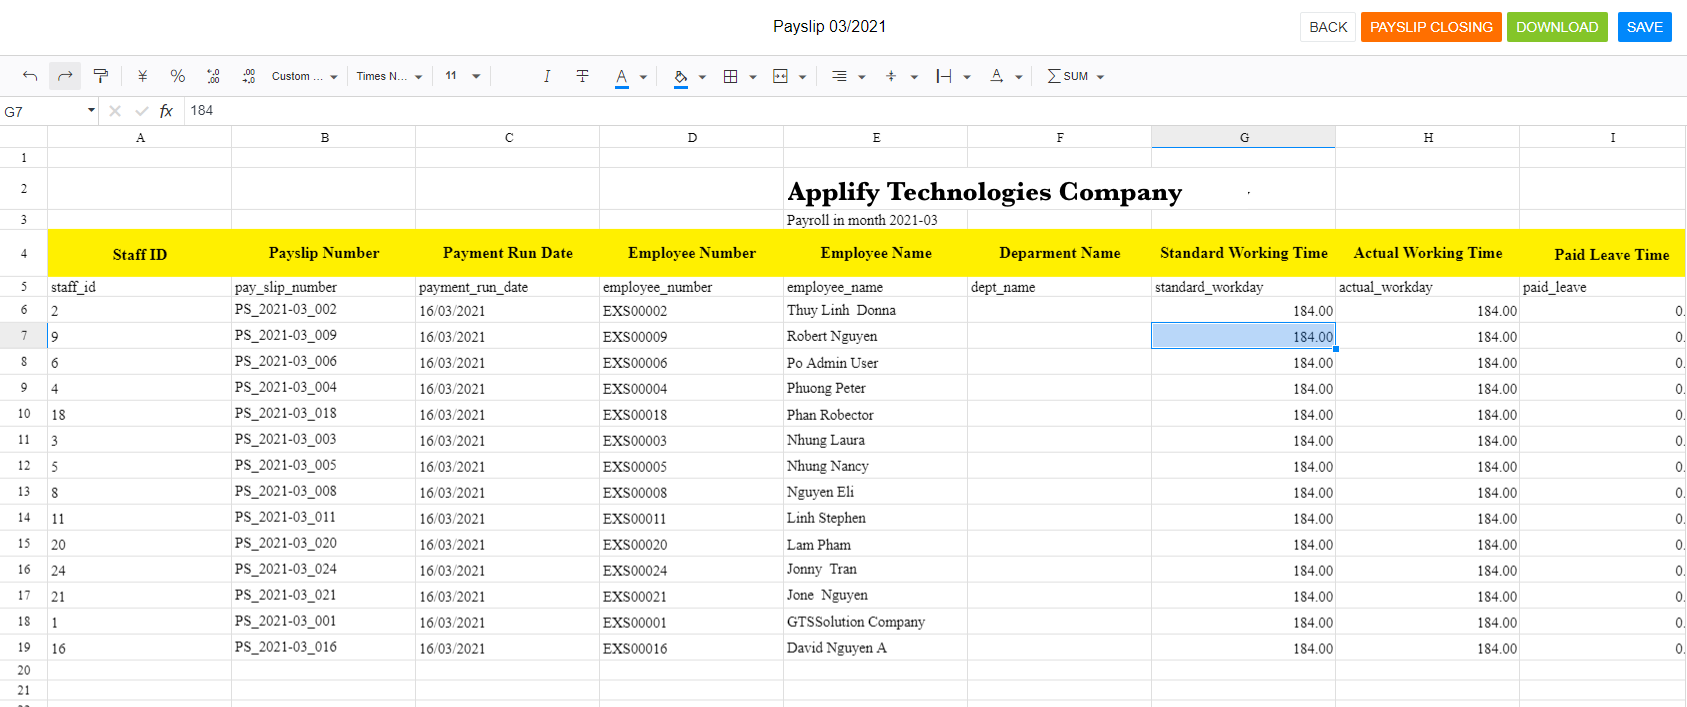
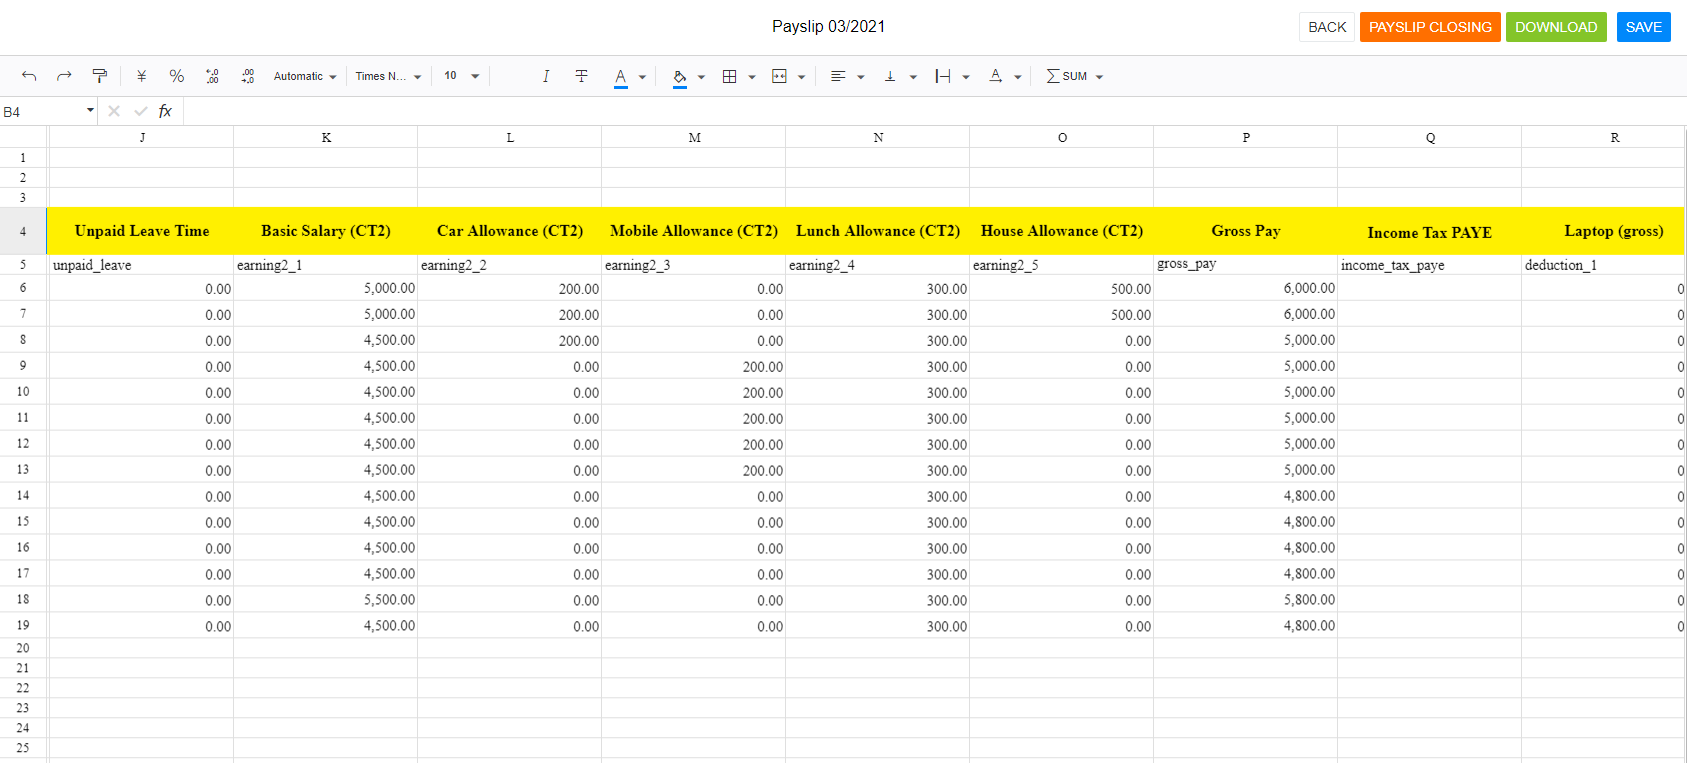
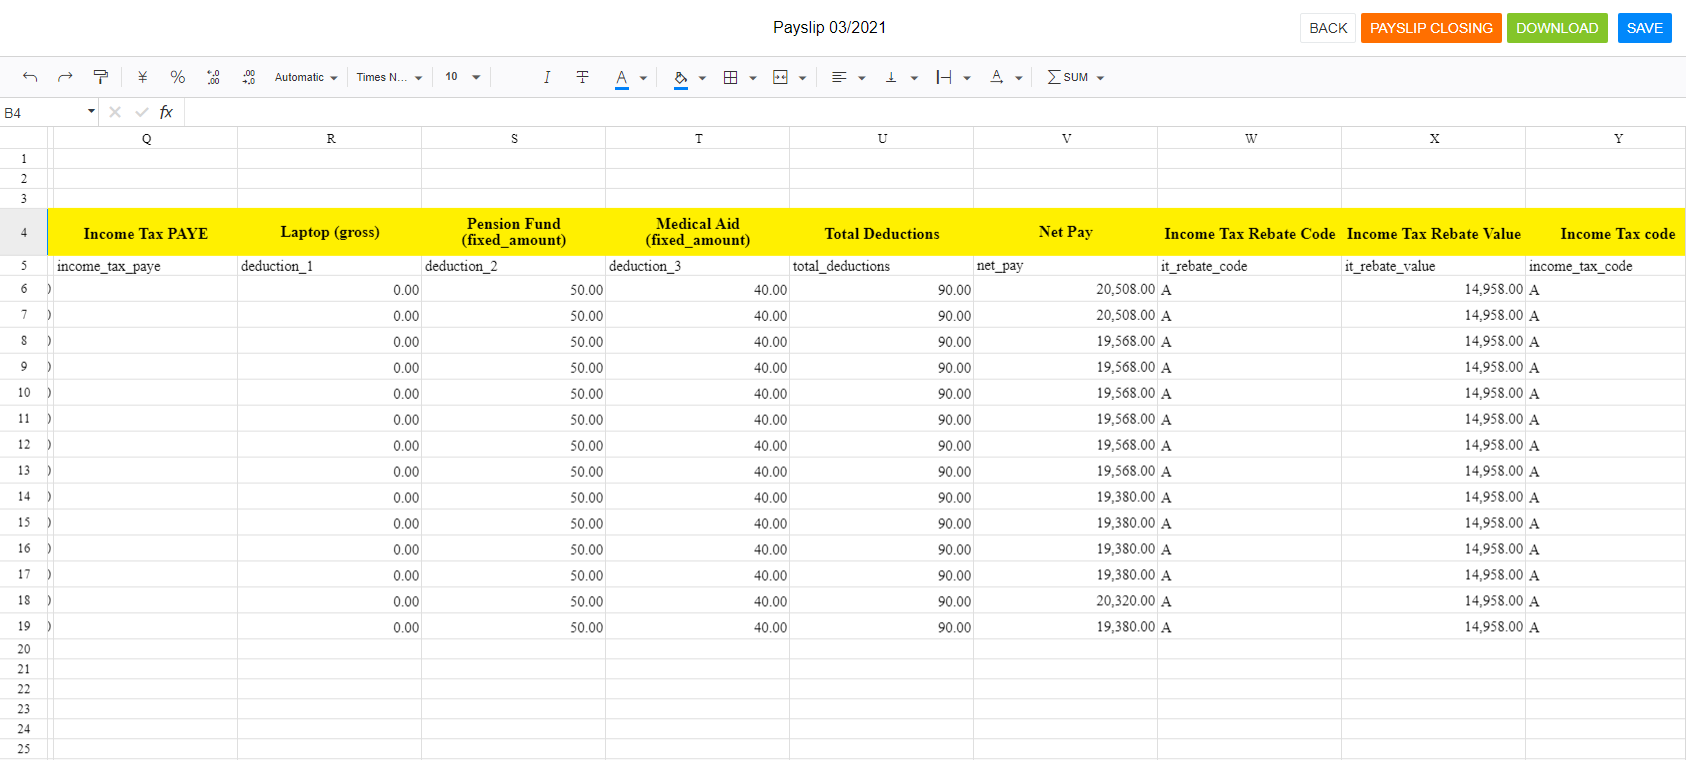

- Here you can change formular for column, but don't add new column or delete.
- Payslip in my profile
- If you integration with HR records module, can you view my payslip .
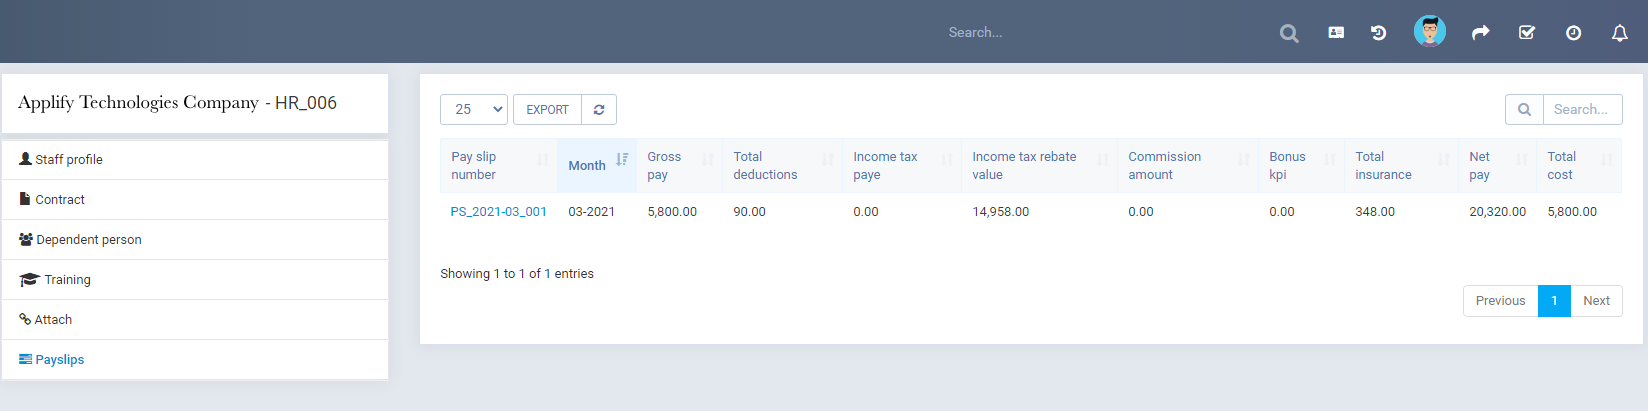
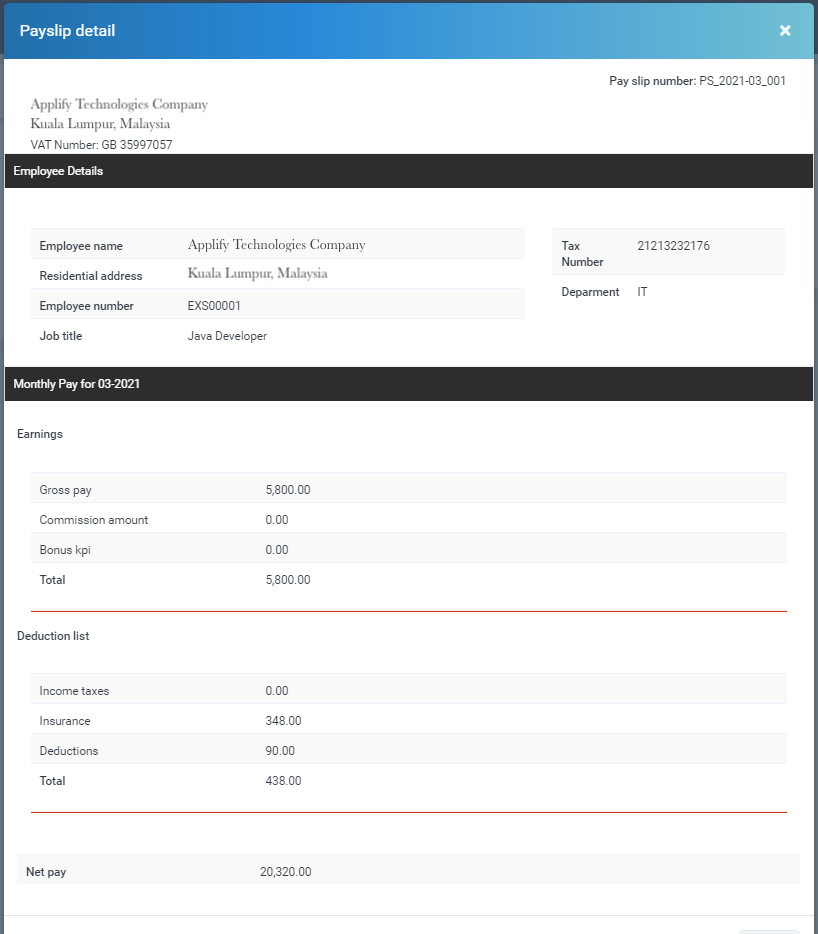
- Payslip detail .
II. Employees.
III. Attendance.
IV. Commissions.
V. Deductions.
VI. Bonus kpi.
VII. Insurances.
VII. Payslip template.
V. Payslip.
-
- Create payslip from payslip template for each month
Once again, thank you so much for subscribing this module. We will be glad to help you if you have any questions relating to this module.
Applify Technologies